Yamaha DTXPLORER Owner's Manual - Page 23
Factory Set - default settings
 |
View all Yamaha DTXPLORER manuals
Add to My Manuals
Save this manual to your list of manuals |
Page 23 highlights
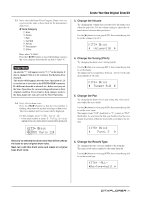
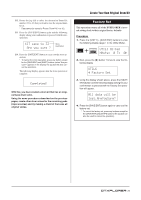
12-2. Rotate the jog dial to select the destination Drum Kit number (33 to 42) that you want to store the original drum kit in. * Data cannot be stored to Preset Drum Kit (1 to 32). 12-3. Press the [SAVE/ENT] button again and the following display asking your confirmation to proceed with the store operation. KIT save to 33 Are you sure ? Store Destination 12-4. Press the [SAVE/ENT] button to carry out the store operation. * To cancel the store operation, press any button except for the [SAVE/ENT] and [SHIFT] buttons (when "Are you sure?" appears in the display, the jog dial will also cancel the operation). The following display appears after the store operation is complete. Completed! With this, you have created a drum kit that has an original bass drum voice. Using the same procedures described on the previous pages, create other drum voices for the remaining pads (input sources) and try making a drum kit that uses all original voices. Create Your Own Original Drum Kit Factory Set This operation returns all of the DTXPLORER's internal settings back to their original factory defaults. Procedure 1. Press the [SHIFT] + [SAVE/ENT] buttons to view the following display (page 1 in the Utility Mode). UTIL1 Hi-hat HHofs= 0 T= 0, 2. Next, press the [>] button 7 times to view the following display. UTIL6 - Factory Set 3. Using the display shown above, press the [SAVE/ ENT] button and the following display asking for your confirmation to proceed with the Factory Set operation will appear. All data will be lost.AreYouSure? 4. Press the [SAVE/ENT] button again to carry out the factory set. * To cancel the factory set, press any buttons except for the [SAVE/ENT] and [SHIFT] buttons (the jog dial can also be used to cancel the operation). 23
-
 1
1 -
2
-
3
-
4
-
5
-
6
-
7
-
8
-
9
-
10
-
11
-
12
-
13
-
14
-
15
-
16
-
17
-
 18
18 -
 19
19 -
 20
20 -
 21
21 -
 22
22 -
 23
23 -
 24
24 -
 25
25 -
 26
26 -
 27
27 -
 28
28 -
29
-
30
-
31
-
32
-
33
-
34
-
35
-
36
 |
 |
