Yamaha DTXPLORER Owner's Manual - Page 9
Connections, Connecting the DTXPLORER's pads to the main unit, Using the DTXPLORER with an Acoustic - drum set
 |
View all Yamaha DTXPLORER manuals
Add to My Manuals
Save this manual to your list of manuals |
Page 9 highlights
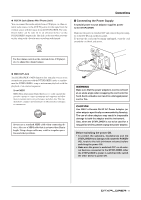
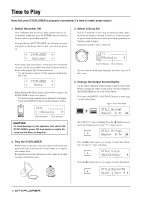
Connections CAUTION To prevent electric shock and damage to the devices, make sure the power is switched OFF on the DTXPLORER and all related devices before making any connections to the DTXPLORER's input and output jacks. Connecting the DTXPLORER's pads to the main unit Refer to the illustration below and connect each pad's output cable to each Trigger Input jack on the rear panel of the DTXPLORER. All Trigger Input Jacks are labeled (1 SNARE, etc.) so make sure each pad is connected to its corresponding Trigger Input jack. * The DTXPLORER's settings will provide optimum performance when pads (1 SNARE, etc.) are connected to their corresponding Trigger Input jacks, however, if other pads or drum triggers that have different operating characteristics are connected to the jacks, settings for sensitivity, etc., as described in the "Trigger Setup Edit" section (P. 24) should be changed. to 6 CRASH to 5 RIDE to 7 HI HAT to 1 SNARE to HI HAT CONTROL to 3 TOM2 to 2 TOM1 to 8 KICK/9 to 4 TOM3 * The kit can be expanded with an optional monaural pad (PCY65, etc.) connected to the external pad input jack on the KP65. Using the DTXPLORER with an Acoustic Drum Kit The DTXPLORER can be played from an acoustic drum kit if the kit is fitted with an optional set of Yamaha DX20 Drum Triggers and the triggers are connected to the DTXPLORER's input jacks. * After making connections, make sure settings in the DTXPLORER's trigger setup (P. 24) are properly adjusted. 9
-
 1
1 -
2
-
3
-
 4
4 -
 5
5 -
 6
6 -
 7
7 -
 8
8 -
 9
9 -
 10
10 -
 11
11 -
 12
12 -
 13
13 -
 14
14 -
15
-
16
-
17
-
18
-
19
-
20
-
21
-
22
-
23
-
24
-
25
-
26
-
27
-
28
-
29
-
30
-
31
-
32
-
33
-
34
-
35
-
36
 |
 |
