Yamaha DVD-S663 Owner's Manual - Page 18
Step 3: Setting a TV type/display and language, Setting a color system for your TV
 |
View all Yamaha DVD-S663 manuals
Add to My Manuals
Save this manual to your list of manuals |
Page 18 highlights
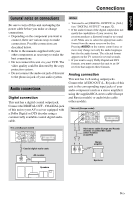
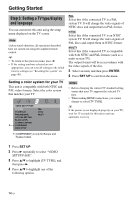
Getting Started Step 3: Setting a TV type/display and language You can customize this unit using the setup menu displayed on the TV screen. Note Unless stated otherwise, all operations described here are carried out using the supplied remote control. y • To return to the previous menu, press 2. • If the setting you have selected are not appropriate, you can reset all settings to the initial factory settings (see "Resetting the system" on page 40). PAL Select this if the connected TV is a PAL system TV. It will change the video signals of NTSC discs and output them in PAL format. NTSC Select this if the connected TV is an NTSC system TV. It will change the video signals of PAL discs and output them in NTSC format. MULTI Select this if the connected TV is compatible with both NTSC and PAL formats (such as a multi-system TV). The output format will be in accordance with the video signals of the disc. 5 Select an item, and then press ENTER. 6 Press SET UP to exit from the menu. Setting a color system for your TV This unit is compatible with both NTSC and PAL video formats. Select the color system that matches your TV. VIDEO SETUP PAGE TV TYPE TV DISPLAY PROGRESSIVE PICTURE SETTING BLACK LEVEL CLOSED CAPTION *....... COMPONENT HDMI SETUP PAL NTSC MULTI Notes • Before changing the current TV standard setting, ensure that your TV supports the selected TV type. • When making HDMI connections, you cannot change or select [TV TYPE]. y If the picture is not displayed properly on your TV, wait for 15 seconds for this unit to activate automatic recovery. *: [COMPONENT] is only for Europe and Russia models. 1 Press SET UP. 2 Press 3 repeatedly to select "VIDEO SETUP PAGE". 3 Press 5/a to highlight [TV TYPE], and then press 3. 4 Press 5/a to highlight one of the following options. 14 En
-
 1
1 -
2
-
3
-
4
-
5
-
6
-
7
-
8
-
9
-
10
-
11
-
12
-
 13
13 -
 14
14 -
 15
15 -
 16
16 -
 17
17 -
 18
18 -
 19
19 -
 20
20 -
 21
21 -
 22
22 -
 23
23 -
24
-
25
-
26
-
27
-
28
-
29
-
30
-
31
-
32
-
33
-
34
-
35
-
36
-
37
-
38
-
39
-
40
-
41
-
42
-
43
-
44
-
45
-
46
-
47
-
48
-
49
-
50
-
51
-
52
-
53
 |
 |
