Yamaha DVD-S663 Owner's Manual - Page 34
Programming disc tracks, except MP3/WMA/WMV/JPEG, Dimming the front panel display, OSD language
 |
View all Yamaha DVD-S663 manuals
Add to My Manuals
Save this manual to your list of manuals |
Page 34 highlights
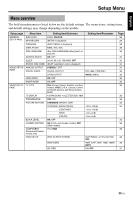
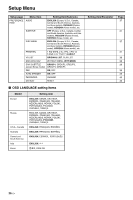
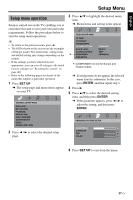
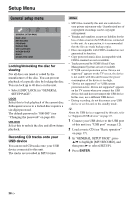
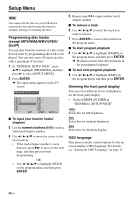
Setup Menu Note You cannot edit the files on your USB device connected to this unit by using this unit (for example, deleting or renaming the files). Programming disc tracks (except MP3/WMA/WMV/JPEG/ DivX®) You can play back the contents of a disc in the desired order by programming the tracks to be played. You can store up to 20 tracks per disc with a maximum of ten discs. 1 In "GENERAL SETUP PAGE", press 5/a to highlight [PROGRAM], and then press 3 to select [INPUT MENU]. 2 Press ENTER. ➜ The input menu appears on the TV screen. PROGRAM: TRACK (01-17) 1 04 2 10 3 __ 4 __ 5 __ EXIT 6 __ 7 __ 8 __ 9 __ 10 _ _ START NEXT ■ To input your favorite tracks/ chapters 3 Use the numeric buttons (0-9) to enter a valid track/chapter number. 4 Use 2 / 3/5/a to move the cursor to the next position. • If the track/chapter number is more than ten, press 33l to move to the next page, and then proceed with programming. OR • Use 2 / 3/5/a to highlight [NEXT] on the program menu, and then press ENTER. 5 Repeat steps 3-4 to input another track/ chapter number. ■ To remove a track 6 Use 2 / 3/5/a to select the track you want to remove. 7 Press ENTER to remove this track from the program menu. ■ To start program playback 8 Use 2 / 3/5/a to highlight [START] on the program menu, and then press ENTER. ➜ Playback starts for the selected tracks in the programmed sequence. ■ To exit from program playback 9 Use 2 / 3/5/a to highlight [EXIT] on the program menu, and then press ENTER. Dimming the front panel display You can select different levels of brightness for the front panel display. • Select [DISPLAY DIM] in "GENERAL SETUP PAGE". 100% Select this for full brightness. 70% Select this for medium brightness. 40% Select this for dimming display. OSD language This menu contains various options for the onscreen display (OSD) language. For details, see "Setting the OSD Language" on page 15. 30 En
-
 1
1 -
2
-
3
-
4
-
5
-
6
-
7
-
8
-
9
-
10
-
11
-
12
-
13
-
14
-
15
-
16
-
17
-
18
-
19
-
20
-
21
-
22
-
23
-
24
-
25
-
26
-
27
-
28
-
 29
29 -
 30
30 -
 31
31 -
 32
32 -
 33
33 -
 34
34 -
 35
35 -
 36
36 -
 37
37 -
 38
38 -
 39
39 -
40
-
41
-
42
-
43
-
44
-
45
-
46
-
47
-
48
-
49
-
50
-
51
-
52
-
53
 |
 |
