Yamaha MCR E810 Owner's Manual - Page 19
Connecting Antennas, Connecting the AM loop antenna - problems
 |
UPC - 027108104751
View all Yamaha MCR E810 manuals
Add to My Manuals
Save this manual to your list of manuals |
Page 19 highlights
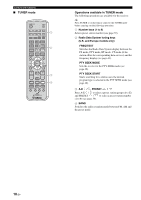
PREPARATION CONNECTING ANTENNAS Connecting Antennas To enjoy radio on the receiver, connect the supplied AM and FM antennas to the designated terminals. If there is a problem of weak radio wave reception in your area or you want to improve radio reception, we recommend that you use optional outdoor antennas. For details, consult the nearest authorized YAMAHA dealer or service center. Note Be sure to set the tuner frequency step (Asia and Taiwan models only) according to the frequency spacing in your area (see page 38). AM loop antenna (supplied) Indoor FM antenna (supplied) DOCK DVD/CD ANTENNA 75 UNBAL. FM GND IN TAPE/MD OUT AM SPEAKERS 6 MIN / SPEAKER R L Note Depending on the product, the shape of the tab is different from the described illust. 3 Insert the AM loop antenna lead wires into the AM terminal. AUX R L Ground (GND terminal) ■ About grounding For maximum safety and minimum interference, connect the antenna GND terminal to a good earth ground. A good earth ground is a metal stake driven into moist earth. Connecting the AM loop antenna 4 Replace the tab back to secure the wire. 1 Attach the antenna stand to the antenna. When attaching the antenna to the wall, you do not need to use the antenna stand. 5 Repeat steps 2 to 4 to insert the AM loop antenna lead wires into the GND terminal. 6 Place the antenna away from the receiver and speaker cables. While listening to the radio, rotate the antenna head to find the best angle for reception. English 2 Press down the tab of the AM terminal. Connecting the FM antenna 1 Connect the supplied indoor FM antenna to the FM jack of the receiver. 2 Place the antenna away from the receiver and speaker cables. 15 En
-
 1
1 -
2
-
3
-
4
-
5
-
6
-
7
-
8
-
9
-
10
-
11
-
12
-
13
-
 14
14 -
 15
15 -
 16
16 -
 17
17 -
 18
18 -
 19
19 -
 20
20 -
 21
21 -
 22
22 -
 23
23 -
 24
24 -
25
-
26
-
27
-
28
-
29
-
30
-
31
-
32
-
33
-
34
-
35
-
36
-
37
-
38
-
39
-
40
-
41
-
42
-
43
-
44
-
45
-
46
-
47
-
48
-
49
-
50
-
51
-
52
-
53
-
54
-
55
-
56
-
57
-
58
-
59
-
60
-
61
-
62
-
63
-
64
-
65
-
66
-
67
-
68
-
69
-
70
-
71
-
72
-
73
-
74
 |
 |
