Yamaha POCKETRAK 2G Reference Manual - Page 10
Starting recording, Press the FOLDER/INDEX button to select a folder A, B, C, D or S. - external mic
 |
UPC - 086792884912
View all Yamaha POCKETRAK 2G manuals
Add to My Manuals
Save this manual to your list of manuals |
Page 10 highlights
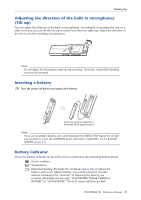
Recording Starting recording Do not remove the battery during recording. You can adjust the direction of the built-in microphones to suit your recording situation (page 5). 1. Press the FOLDER/INDEX button to select a folder (A, B, C, D or S). Hint: The A, B, C, D and S folders store audio files (such as a conversation, for example) recorded via the recorder's microphones. The L folder stores music recorded from a connected external device, such as a CD player. The M folder stores music files transferred from a computer. For detailed explanation of the folders, refer to page 41. Note: · Press and hold down the FOLDER/INDEX button for at least two seconds to select the S folder. · Do not select the L or M folder. The L and M folders are not VOICE folders. If you select one of them, built-in microphone recordings will be recorded automatically to the A folder. However, if the A folder is full, no additional built-in microphone recordings are possible (until you delete some recordings). · The unit can record up to 99 files in any one folder (A, B, C, D or S). "FILE FULL" appears if you attempt to record a 100th file in any folder. 2. Press the PAUSE/REC button. The recording LED lights up and recording starts. Elapsed recording time Remaining recording time File number Total file number Note: · When MIC ALC is set to OFF, the recorder enters the recording standby mode. Press the PAUSE/REC button again to start recording. · With some files, the elapsed recording time displayed on the LCD may differ from the actual elapsed time. 10 POCKETRAK 2G Reference Manual
-
 1
1 -
2
-
3
-
4
-
 5
5 -
 6
6 -
 7
7 -
 8
8 -
 9
9 -
 10
10 -
 11
11 -
 12
12 -
 13
13 -
 14
14 -
 15
15 -
16
-
17
-
18
-
19
-
20
-
21
-
22
-
23
-
24
-
25
-
26
-
27
-
28
-
29
-
30
-
31
-
32
-
33
-
34
-
35
-
36
-
37
-
38
-
39
-
40
-
41
-
42
-
43
-
44
-
45
-
46
-
47
-
48
-
49
-
50
-
51
-
52
-
53
-
54
 |
 |
