Yamaha RX-V461 Owner's Manual - Page 17
Setting the speaker impedance (U.S.A. and Canada models only), Before connecting to the SPEAKERS - straight
 |
UPC - 027108927671
View all Yamaha RX-V461 manuals
Add to My Manuals
Save this manual to your list of manuals |
Page 17 highlights
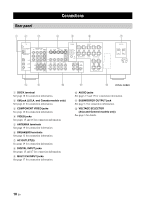
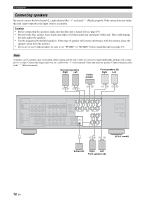
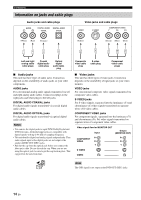
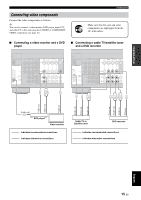
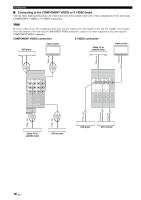
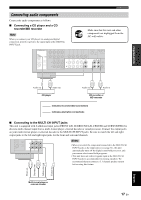
PREPARATION ■ Before connecting to the SPEAKERS terminal A speaker cord is actually a pair of insulated cables running side by side. Cables are colored or shaped differently, perhaps with a stripe, groove or ridges. Connect the striped (grooved, etc.) cable to the "+" (red) terminals of this unit and your speaker. Connect the plain cable to the "-" (black) terminals. Remove approximately 10 mm (3/8") of insulation from the end of each speaker cable and then twist the bare wires of the cable together to prevent short circuits. Connections Setting the speaker impedance (U.S.A. and Canada models only) Caution If you are to use 6 ohm speakers, set "SP IMP." to "6Ω MIN" as follows BEFORE using this unit. 1 Make sure this unit is turned off. See page 19 for details about turning on or off this unit. 10 mm (3/8") ■ Connecting to the SPEAKERS terminals 2 Press and hold 0TONE CONTROL and then press 1STANDBY/ON to turn on this unit. This unit turns on, an the advanced setup menu appears in the front panel display. 2 1 3 Red: positive (+) Black: negative (-) 3 Press APROGRAM l / h repeatedly to select "SP IMP.". The following display appears in the front panel display. SP IMP.- 8 MIN 1 Loosen the knob. 2 Insert the bare end of the speaker wire into the hole on the terminal. 3 Tighten the knob to secure the wire. 4 Press BSTRAIGHT repeatedly to select "6Ω MIN". The following display appears in the front panel display. Connecting the banana plug (except Korea and Asia models) The banana plug is a single-pole electrical connector widely used to terminate speaker cables. First, tighten the knob and then insert the banana plug connector into the end of the corresponding terminal. Banana plug SP IMP.- 6 MIN 5 Press 1STANDBY/ON to confirm your selection and set this unit to the standby mode. Note The setting you made is reflected next time you turn on this unit. English 13 En
-
 1
1 -
2
-
3
-
4
-
5
-
6
-
7
-
8
-
9
-
10
-
11
-
 12
12 -
 13
13 -
 14
14 -
 15
15 -
 16
16 -
 17
17 -
 18
18 -
 19
19 -
 20
20 -
 21
21 -
 22
22 -
23
-
24
-
25
-
26
-
27
-
28
-
29
-
30
-
31
-
32
-
33
-
34
-
35
-
36
-
37
-
38
-
39
-
40
-
41
-
42
-
43
-
44
-
45
-
46
-
47
-
48
-
49
-
50
-
51
-
52
-
53
-
54
-
55
-
56
-
57
-
58
-
59
-
60
-
61
-
62
-
63
-
64
-
65
-
66
-
67
-
68
-
69
-
70
-
71
-
72
-
73
-
74
-
75
-
76
-
77
-
78
-
79
-
80
-
81
-
82
-
83
-
84
-
85
-
86
-
87
-
88
-
89
-
90
-
91
-
92
-
93
 |
 |
