Yamaha RX-V595aRDS Owner's Manual - Page 9
English, In the TIME/LEVEL mode
 |
View all Yamaha RX-V595aRDS manuals
Add to My Manuals
Save this manual to your list of manuals |
Page 9 highlights
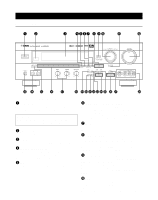
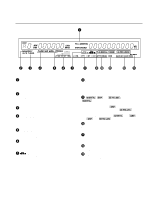
English q INPUT MODE This button switches between the DVD/LD and TV/DBS input signal modes. w VOLUME This control is used to raise or lower the volume level. e PHONES jack When you use headphones, connect the headphones to the PHONES jack. You can listen to the sound to be output from the main speakers through the headphones. When using headphones only, set both SPEAKERS A and B to the OFF position and switch off the digital sound field processor (so that no DSP program name appears on the display) by pressing EFFECT. r SPEAKERS Set A or B (or both A and B) to the ON position for the main speaker system (connected to this unit) that you want to use. Set the button(s) for the main speaker system you don't want to use to the OFF position. t A/B/C/D/E Press this button to select one of a group (A to E) of preset stations. y Preset station number selector Each of these buttons selects a preset station number (1 to 8). u Tone controls These controls are only effective for the sound from the main speakers. BASS Use this control to increase or decrease the low-frequency response. The "0" position produces a flat response. TREBLE Use this control to increase or decrease the high-frequency response. The "0" position produces a flat response. i BALANCE This control is only effective for the sound from the main speakers. Turn the control to adjust the balance of the output volume to the left and right speakers to compensate for sound imbalance caused by the speaker location or listening room conditions. o RDS MODE When an RDS station is received, pressing this button changes the display mode into the PS mode, PTY mode, RT mode and/ or CT mode (if the station employs those RDS data services) in turn. p PTY SEEK MODE When this button is pressed, the unit is set in the PTY SEEK mode. a PTY SEEK START Press this button to begin searching for a station after the desired program type has been selected in the PTY SEEK mode. s EON Press this button to select the desired program type (NEWS, INFO, AFFAIRS, SPORT) when you want to call a radio program of that type automatically. d TIME/LEVEL Press this button to select the item in the TIME/LEVEL mode. f +/- These buttons are used to adjust the settings of the SET MENU mode and the TIME/LEVEL mode. In the TIME/LEVEL mode, press + to increase the delay time or speaker output level. Press - to decrease the delay time or speaker output level. g SET MENU Press this button to select functions in the SET MENU mode. h PROGRAM selector Press or to select a DSP program. The name of the selected program appears on the display. j EFFECT Press this button once to switch the effect speakers (center and rear) on or off. If you turn off the effect by using EFFECT, all Dolby Digital and DTS audio signals are directed to the main left and right channels. In that case, the left and right channel signal levels may not match. k VIDEO AUX terminals Connect an auxiliary video or audio input source such as a camcorder to these terminals. If the connected video unit has an S video output terminal, connect it to the S VIDEO terminal to obtain a high-resolution picture. The source connected to these terminals can be selected by INPUT. 9
-
 1
1 -
2
-
3
-
 4
4 -
 5
5 -
 6
6 -
 7
7 -
 8
8 -
 9
9 -
 10
10 -
 11
11 -
 12
12 -
 13
13 -
 14
14 -
15
-
16
-
17
-
18
-
19
-
20
-
21
-
22
-
23
-
24
-
25
-
26
-
27
-
28
-
29
-
30
-
31
-
32
-
33
-
34
-
35
-
36
-
37
-
38
-
39
-
40
-
41
-
42
-
43
-
44
-
45
-
46
-
47
-
48
-
49
-
50
-
51
-
52
-
53
-
54
-
55
-
56
-
57
-
58
-
59
-
60
 |
 |
