Yamaha WXA-50 WXA-50 Owner s Manual Advanced - Page 7
Rear panel, TRIGGER IN/OUT jacks
 |
View all Yamaha WXA-50 manuals
Add to My Manuals
Save this manual to your list of manuals |
Page 7 highlights
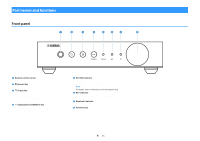
Rear panel a b c d ef g h i j 1 AC IN jack For connecting the supplied power cable (p.13). 2 TRIGGER IN/OUT jacks For connecting to an external device that supports the trigger function (p.12). 3 Wireless switch Turns on/off wireless communications (wireless LAN connection and Bluetooth). Position Function Enables the wireless LAN and Bluetooth connection. Enables the Bluetooth connection only. Use a wired LAN connection if connecting to a network. Disables the wireless LAN and Bluetooth connection. Use a wired LAN connection if connecting to a network. Note After changing this switch, be sure to disconnect the power cable from the AC wall outlet and plug it again. 4 AUX IN jacks For connecting to audio components (such as audio players) equipped with analog output (p.12). k l 5 AUX OUT jacks For connecting to audio components (such as pre-main amplifiers) equipped with analog input. 6 REMOTE IN jack For connecting to an external component for remote control. By connecting an infrared receiver to the REMOTE IN jack, you can operate the unit using the supplied remote control even if the unit is stored out of sight. 7 SPEAKERS terminals For connecting to speakers (p.11). 8 Wireless antenna For a wireless (Wi-Fi) connection to a network and a Bluetooth connection (p.4). 7 En 9 OPT IN jack For connecting to audio components equipped with optical digital output (p.12). : NETWORK jack For a wired connection to a network (p.15). Note ▪ When using a wireless LAN connection (Wi-Fi), a wired LAN connection is not necessary. ▪ When playing back high resolution contents (p.42) via the network, we recommend using the wired network connection for stable playback. A USB jack For connecting a USB storage device (p.19). B SUBWOOFER jack For connecting to a subwoofer with built-in amplifier (p.12).
-
 1
1 -
 2
2 -
 3
3 -
 4
4 -
 5
5 -
 6
6 -
 7
7 -
 8
8 -
 9
9 -
 10
10 -
 11
11 -
 12
12 -
13
-
14
-
15
-
16
-
17
-
18
-
19
-
20
-
21
-
22
-
23
-
24
-
25
-
26
-
27
-
28
-
29
-
30
-
31
-
32
-
33
-
34
-
35
-
36
-
37
-
38
-
39
-
40
-
41
-
42
-
43
-
44
-
45
-
46
 |
 |
