2007 BMW M5 Owner's Manual - Page 212
2007 BMW M5 Manual
Page 212 highlights
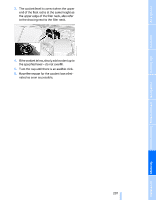
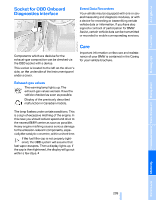
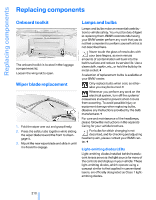
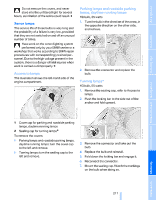
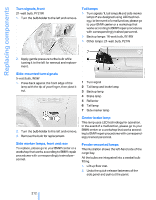
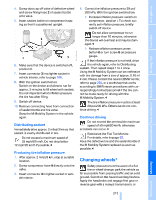
Replacing components Replacing components Onboard toolkit Lamps and bulbs Lamps and bulbs make an essential contribution to vehicle safety. You must be duly diligent in replacing them. BMW recommends having your BMW center perform any work that you do not feel competent to perform yourself or that is not described here. Never touch the glass of new bulbs with your bare fingers, as even minute amounts of contamination will burn into the bulb's surface and reduce its service life. Use a clean cloth, napkin, etc., or hold the bulb by its metal socket.< A selection of replacement bulbs is available at your BMW center. Only replace bulbs when cool, as otherwise you may be burned.< Whenever you perform any work on the electrical system, turn off the systems/ consumers involved to prevent short circuits from occurring. To avoid possible injury or equipment damage when replacing bulbs, observe any instructions provided by the bulb manufacturer.< For care and maintenance of the headlamps, please follow the instructions in the separate Caring for your vehicle brochure. For bulbs for which changing is not described, and for checking and adjusting headlamp aim, please contact your BMW center.< The onboard toolkit is located in the luggage compartment lid. Loosen the wing nut to open. Wiper blade replacement 1. Fold the wiper arm out and grasp firmly. 2. Press the safety tabs together while sliding the wiper blade toward the front to disengage it. 3. Mount the new wiper blade and slide in until it is heard to engage. Light-emitting diodes LEDs Light-emitting diodes installed behind translucent lenses serve as the light source for many of the controls and displays in your vehicle. These light-emitting diodes, which operate using a concept similar to that applied in conventional lasers, are officially designated as Class 1 lightemitting diodes. 210 Online Edition for Part no. 01 41 0 013 310 - © 02/07 BMW AG
-
 1
1 -
2
-
3
-
4
-
5
-
6
-
7
-
8
-
9
-
10
-
11
-
12
-
13
-
14
-
15
-
16
-
17
-
18
-
19
-
20
-
21
-
22
-
23
-
24
-
25
-
26
-
27
-
28
-
29
-
30
-
31
-
32
-
33
-
34
-
35
-
36
-
37
-
38
-
39
-
40
-
41
-
42
-
43
-
44
-
45
-
46
-
47
-
48
-
49
-
50
-
51
-
52
-
53
-
54
-
55
-
56
-
57
-
58
-
59
-
60
-
61
-
62
-
63
-
64
-
65
-
66
-
67
-
68
-
69
-
70
-
71
-
72
-
73
-
74
-
75
-
76
-
77
-
78
-
79
-
80
-
81
-
82
-
83
-
84
-
85
-
86
-
87
-
88
-
89
-
90
-
91
-
92
-
93
-
94
-
95
-
96
-
97
-
98
-
99
-
100
-
101
-
102
-
103
-
104
-
105
-
106
-
107
-
108
-
109
-
110
-
111
-
112
-
113
-
114
-
115
-
116
-
117
-
118
-
119
-
120
-
121
-
122
-
123
-
124
-
125
-
126
-
127
-
128
-
129
-
130
-
131
-
132
-
133
-
134
-
135
-
136
-
137
-
138
-
139
-
140
-
141
-
142
-
143
-
144
-
145
-
146
-
147
-
148
-
149
-
150
-
151
-
152
-
153
-
154
-
155
-
156
-
157
-
158
-
159
-
160
-
161
-
162
-
163
-
164
-
165
-
166
-
167
-
168
-
169
-
170
-
171
-
172
-
173
-
174
-
175
-
176
-
177
-
178
-
179
-
180
-
181
-
182
-
183
-
184
-
185
-
186
-
187
-
188
-
189
-
190
-
191
-
192
-
193
-
194
-
195
-
196
-
197
-
198
-
199
-
200
-
201
-
202
-
203
-
204
-
205
-
206
-
 207
207 -
 208
208 -
 209
209 -
 210
210 -
 211
211 -
 212
212 -
 213
213 -
 214
214 -
 215
215 -
 216
216 -
 217
217 -
218
-
219
-
220
-
221
-
222
-
223
-
224
-
225
-
226
-
227
-
228
-
229
-
230
-
231
-
232
-
233
-
234
-
235
-
236
-
237
-
238
-
239
-
240
-
241
-
242
-
243
-
244
-
245
-
246
-
247
-
248
-
249
-
250
-
251
-
252
-
253
-
254
-
255
-
256
 |
 |
