2007 BMW M5 Owner's Manual - Page 219
2007 BMW M5 Manual

Page 219 highlights
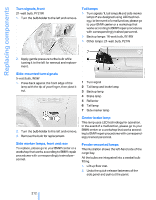
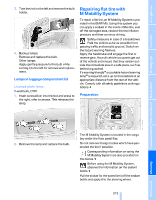
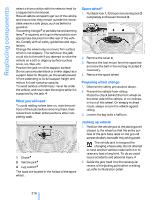
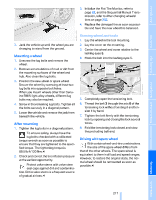
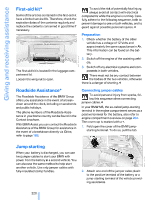
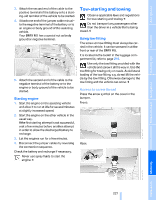
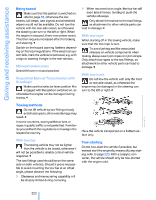
3. Initialize the Flat Tire Monitor, refer to page 82, and the Sequential Manual Transmission, refer to After changing wheels/ tires on page 202. 4. Replace the damaged tire as soon as possible and have the new wheel/tire balanced. 1. Lay the wheel in the tool mounting. 3. Jack the vehicle up until the wheel you are changing is raised from the ground. 2. Lay the cover on the mounting. 3. Center the wheel and cover relative to the lashing eyes 5. 4. Hook the belt into the lashing eyes 5. 1. Unscrew the lug bolts and remove the wheel. 2. Remove accumulations of mud or dirt from the mounting surfaces of the wheel and hub. Also clean the lug bolts. 3. Position the new wheel or spare wheel. Secure the wheel by screwing at least two lug bolts into opposite bolt holes. When you mount wheels other than Genuine BMW light-alloy wheels, different lug bolts may also be required. 4. Screw in the remaining lug bolts. Tighten all the bolts securely in a diagonal pattern. 5. Lower the vehicle and remove the jack from beneath the vehicle. 5. Completely open the tensioning lock. 6. Thread the belt 3 through the axis 6 of the tensioning lock without twisting it and tension it by hand. 7. Tighten the belt firmly with the tensioning lock by opening and closing the lock several times. 8. Fold the tensioning lock closed and stow the protruding belt end. After mounting 1. Tighten the lug bolts in a diagonal pattern. To ensure safety, always have the lug bolts checked with a calibrated torque wrench as soon as possible to ensure that they are tightened to the specified torque. The tightening torque is 88.5 lb ft/120 Nm.< 2. Check and correct the tire inflation pressure at the earliest opportunity. Protect valve stems with valve stem seal caps against dirt and contamination. Dirt in valve stems is a frequent source of gradual air loss.< Driving with spare wheel With certain wheel-and-tire combinations the size of the spare wheel differs from that of the other wheels. The spare wheel is equivalent to them in all load and speed ranges. However, to restore the original state, the normal wheel should be remounted as soon as possible.< 217 Online Edition for Part no. 01 41 0 013 310 - © 02/07 BMW AG Reference Mobility Communications Entertainment Navigation Driving tips Mounting a wheel Controls Stowing wheel and tools At a glance
-
 1
1 -
2
-
3
-
4
-
5
-
6
-
7
-
8
-
9
-
10
-
11
-
12
-
13
-
14
-
15
-
16
-
17
-
18
-
19
-
20
-
21
-
22
-
23
-
24
-
25
-
26
-
27
-
28
-
29
-
30
-
31
-
32
-
33
-
34
-
35
-
36
-
37
-
38
-
39
-
40
-
41
-
42
-
43
-
44
-
45
-
46
-
47
-
48
-
49
-
50
-
51
-
52
-
53
-
54
-
55
-
56
-
57
-
58
-
59
-
60
-
61
-
62
-
63
-
64
-
65
-
66
-
67
-
68
-
69
-
70
-
71
-
72
-
73
-
74
-
75
-
76
-
77
-
78
-
79
-
80
-
81
-
82
-
83
-
84
-
85
-
86
-
87
-
88
-
89
-
90
-
91
-
92
-
93
-
94
-
95
-
96
-
97
-
98
-
99
-
100
-
101
-
102
-
103
-
104
-
105
-
106
-
107
-
108
-
109
-
110
-
111
-
112
-
113
-
114
-
115
-
116
-
117
-
118
-
119
-
120
-
121
-
122
-
123
-
124
-
125
-
126
-
127
-
128
-
129
-
130
-
131
-
132
-
133
-
134
-
135
-
136
-
137
-
138
-
139
-
140
-
141
-
142
-
143
-
144
-
145
-
146
-
147
-
148
-
149
-
150
-
151
-
152
-
153
-
154
-
155
-
156
-
157
-
158
-
159
-
160
-
161
-
162
-
163
-
164
-
165
-
166
-
167
-
168
-
169
-
170
-
171
-
172
-
173
-
174
-
175
-
176
-
177
-
178
-
179
-
180
-
181
-
182
-
183
-
184
-
185
-
186
-
187
-
188
-
189
-
190
-
191
-
192
-
193
-
194
-
195
-
196
-
197
-
198
-
199
-
200
-
201
-
202
-
203
-
204
-
205
-
206
-
207
-
208
-
209
-
210
-
211
-
212
-
213
-
 214
214 -
 215
215 -
 216
216 -
 217
217 -
 218
218 -
 219
219 -
 220
220 -
 221
221 -
 222
222 -
 223
223 -
 224
224 -
225
-
226
-
227
-
228
-
229
-
230
-
231
-
232
-
233
-
234
-
235
-
236
-
237
-
238
-
239
-
240
-
241
-
242
-
243
-
244
-
245
-
246
-
247
-
248
-
249
-
250
-
251
-
252
-
253
-
254
-
255
-
256
 |
 |
