1997 Chevrolet Monte Carlo Owner's Manual - Page 128
1997 Chevrolet Monte Carlo Manual
Page 128 highlights
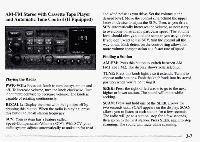
AUTO TONE: This featureallows you to choose preset bass and treble equalization settings designed for classical, news, rock, pop, country/western and jazz stations. C/W will appear on thedisplay when you first press AUTO TONE. Each time you press it, another setting will appear on the display. Press it again after JAZZ appears and the AUTO TONE display will go blank. Tone control will return to the BASS and TREB knobs. Also, if you use the BASS and TREB knobs, control will return to them and the AUTO TONE display will go blank. Playing a Cassette Tape Your tape player is built to work best with tapes that are 30 to 45 minutes long on each side. Tapes longer than that are so thin they may not work well in this player. If a tape is inserted when the ignition is on but the radio is off, the tape will begin playing. A tape symbol is shown in the center of the graphic display whenever a tape is inserted. When a tape isactive, the tape symbol will be accompanied by a direction arrow. While the tape is playing, use the VOL, AUTO TONE, BAL, FADE, BASS and TREB controls just as you do for the radio. Other controls may have different functions when a tape is inserted. The display will show the tape symbol and an arrow to show which side of the tape is playing. If you hear nothing or hear just a garbled sound, it may not be in squarely. Press EJECT to remove the tape and start over. The player is able to detect a tight or broken tape, and will eject the tape. The radio will go back to playing the last station selected. The player automatically senses the cartridge for metal or Cr02 and sets the pre-emphasis. Anytime a tape is inserted, the top side is selected to play first. Adjusting the Speakers BAL: Press this knob lightly so it extends. Turn the knob clockwise for the right speakers and counterclockwise for the left speakers. The middle position balances the sound between the speakers. FADE: Press this knob lightly so it extends. Turn the knob clockwise to adjust the sound to the front speakers and counterclockwise for the rear speakers. The middle position balances the sound between the speakers. Push these knobs back into their stored positions when you're not using them.
-
 1
1 -
2
-
3
-
4
-
5
-
6
-
7
-
8
-
9
-
10
-
11
-
12
-
13
-
14
-
15
-
16
-
17
-
18
-
19
-
20
-
21
-
22
-
23
-
24
-
25
-
26
-
27
-
28
-
29
-
30
-
31
-
32
-
33
-
34
-
35
-
36
-
37
-
38
-
39
-
40
-
41
-
42
-
43
-
44
-
45
-
46
-
47
-
48
-
49
-
50
-
51
-
52
-
53
-
54
-
55
-
56
-
57
-
58
-
59
-
60
-
61
-
62
-
63
-
64
-
65
-
66
-
67
-
68
-
69
-
70
-
71
-
72
-
73
-
74
-
75
-
76
-
77
-
78
-
79
-
80
-
81
-
82
-
83
-
84
-
85
-
86
-
87
-
88
-
89
-
90
-
91
-
92
-
93
-
94
-
95
-
96
-
97
-
98
-
99
-
100
-
101
-
102
-
103
-
104
-
105
-
106
-
107
-
108
-
109
-
110
-
111
-
112
-
113
-
114
-
115
-
116
-
117
-
118
-
119
-
120
-
121
-
122
-
 123
123 -
 124
124 -
 125
125 -
 126
126 -
 127
127 -
 128
128 -
 129
129 -
 130
130 -
 131
131 -
 132
132 -
 133
133 -
134
-
135
-
136
-
137
-
138
-
139
-
140
-
141
-
142
-
143
-
144
-
145
-
146
-
147
-
148
-
149
-
150
-
151
-
152
-
153
-
154
-
155
-
156
-
157
-
158
-
159
-
160
-
161
-
162
-
163
-
164
-
165
-
166
-
167
-
168
-
169
-
170
-
171
-
172
-
173
-
174
-
175
-
176
-
177
-
178
-
179
-
180
-
181
-
182
-
183
-
184
-
185
-
186
-
187
-
188
-
189
-
190
-
191
-
192
-
193
-
194
-
195
-
196
-
197
-
198
-
199
-
200
-
201
-
202
-
203
-
204
-
205
-
206
-
207
-
208
-
209
-
210
-
211
-
212
-
213
-
214
-
215
-
216
-
217
-
218
-
219
-
220
-
221
-
222
-
223
-
224
-
225
-
226
-
227
-
228
-
229
-
230
-
231
-
232
-
233
-
234
-
235
-
236
-
237
-
238
-
239
-
240
-
241
-
242
-
243
-
244
-
245
-
246
-
247
-
248
-
249
-
250
-
251
-
252
-
253
-
254
-
255
-
256
-
257
-
258
-
259
-
260
-
261
-
262
-
263
-
264
-
265
-
266
-
267
-
268
-
269
-
270
-
271
-
272
-
273
-
274
-
275
-
276
-
277
-
278
-
279
-
280
-
281
-
282
-
283
-
284
-
285
-
286
-
287
-
288
-
289
-
290
-
291
-
292
-
293
-
294
-
295
-
296
-
297
-
298
-
299
-
300
-
301
-
302
-
303
-
304
-
305
-
306
-
307
-
308
-
309
-
310
-
311
-
312
-
313
-
314
-
315
-
316
-
317
-
318
-
319
-
320
-
321
-
322
-
323
-
324
-
325
-
326
-
327
-
328
-
329
-
330
-
331
-
332
-
333
-
334
-
335
-
336
-
337
-
338
-
339
-
340
-
341
-
342
-
343
-
344
-
345
-
346
-
347
-
348
-
349
-
350
-
351
-
352
-
353
-
354
-
355
-
356
-
357
-
358
 |
 |