2015 Ducati Superbike 1299 Panigale S Owners Manual - Page 202
2015 Ducati Superbike 1299 Panigale S Manual

Page 202 highlights
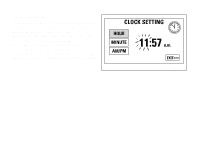
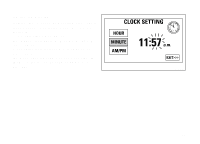
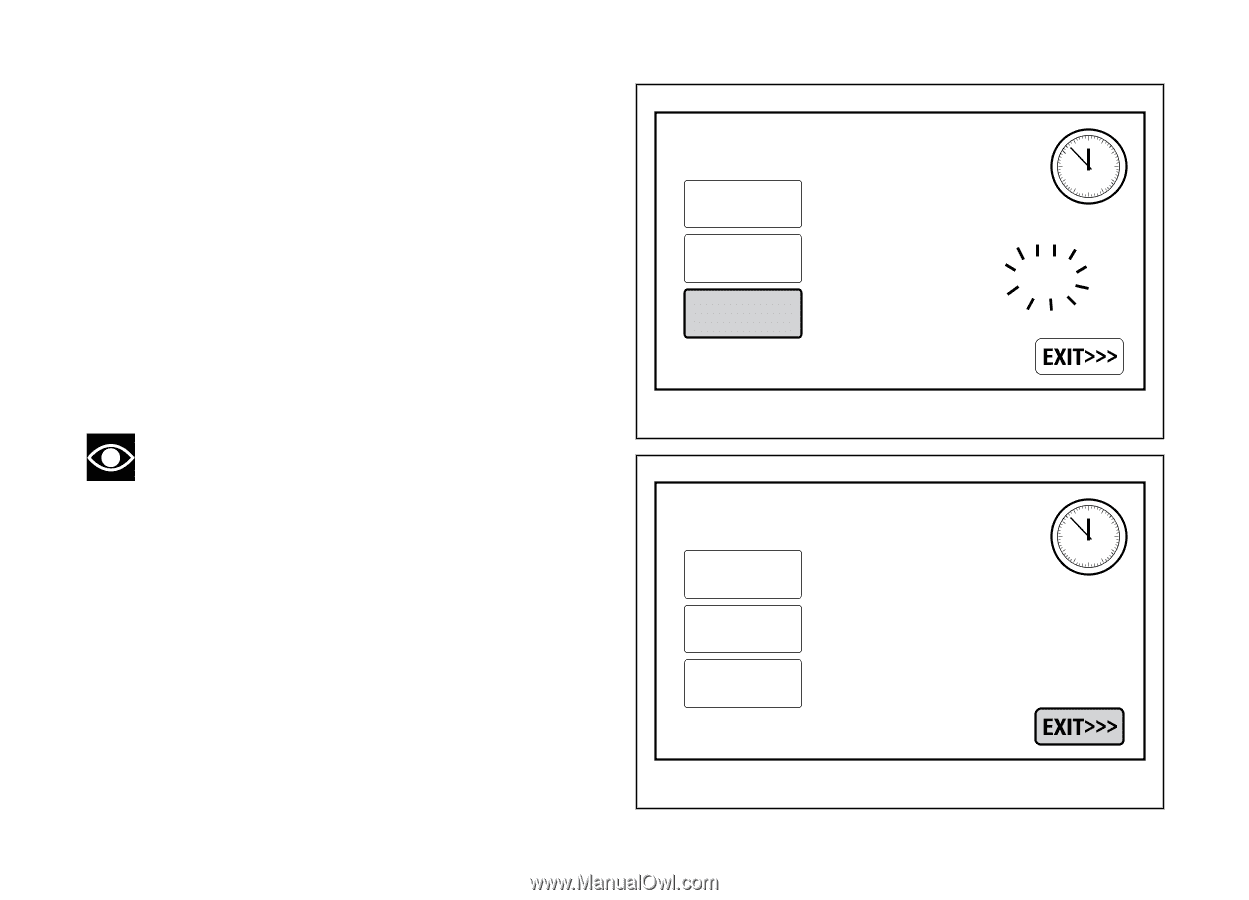
Setting am/pm Select "AM/PM" option, by pressing button (1) or (2). Once function is highlighted, press CONFIRM MENU button (4). The indication starts flashing. Select AM or PM, by pressing button (1) or (2), respectively. Once you reach the value to be set, press CONFIRM MENU button (4) and the setting will stop flashing. To exit the menu and go back to previous page, select EXIT and press button (4). CLOCK SETTING 10 9 8 11 12 1 2 3 4 7 6 5 HOUR MINUTE AM/PM 11:57 a.m. Fig 111 Note Every time the battery is disconnected, the clock is reset and must be set again by the user. CLOCK SETTING 10 9 8 11 12 1 2 3 4 7 6 5 HOUR MINUTE AM/PM 11:57 a.m. Fig 112 200
-
 1
1 -
2
-
3
-
4
-
5
-
6
-
7
-
8
-
9
-
10
-
11
-
12
-
13
-
14
-
15
-
16
-
17
-
18
-
19
-
20
-
21
-
22
-
23
-
24
-
25
-
26
-
27
-
28
-
29
-
30
-
31
-
32
-
33
-
34
-
35
-
36
-
37
-
38
-
39
-
40
-
41
-
42
-
43
-
44
-
45
-
46
-
47
-
48
-
49
-
50
-
51
-
52
-
53
-
54
-
55
-
56
-
57
-
58
-
59
-
60
-
61
-
62
-
63
-
64
-
65
-
66
-
67
-
68
-
69
-
70
-
71
-
72
-
73
-
74
-
75
-
76
-
77
-
78
-
79
-
80
-
81
-
82
-
83
-
84
-
85
-
86
-
87
-
88
-
89
-
90
-
91
-
92
-
93
-
94
-
95
-
96
-
97
-
98
-
99
-
100
-
101
-
102
-
103
-
104
-
105
-
106
-
107
-
108
-
109
-
110
-
111
-
112
-
113
-
114
-
115
-
116
-
117
-
118
-
119
-
120
-
121
-
122
-
123
-
124
-
125
-
126
-
127
-
128
-
129
-
130
-
131
-
132
-
133
-
134
-
135
-
136
-
137
-
138
-
139
-
140
-
141
-
142
-
143
-
144
-
145
-
146
-
147
-
148
-
149
-
150
-
151
-
152
-
153
-
154
-
155
-
156
-
157
-
158
-
159
-
160
-
161
-
162
-
163
-
164
-
165
-
166
-
167
-
168
-
169
-
170
-
171
-
172
-
173
-
174
-
175
-
176
-
177
-
178
-
179
-
180
-
181
-
182
-
183
-
184
-
185
-
186
-
187
-
188
-
189
-
190
-
191
-
192
-
193
-
194
-
195
-
196
-
 197
197 -
 198
198 -
 199
199 -
 200
200 -
 201
201 -
 202
202 -
 203
203 -
 204
204 -
 205
205 -
 206
206 -
 207
207 -
208
-
209
-
210
-
211
-
212
-
213
-
214
-
215
-
216
-
217
-
218
-
219
-
220
-
221
-
222
-
223
-
224
-
225
-
226
-
227
-
228
-
229
-
230
-
231
-
232
-
233
-
234
-
235
-
236
-
237
-
238
-
239
-
240
-
241
-
242
-
243
-
244
-
245
-
246
-
247
-
248
-
249
-
250
-
251
-
252
-
253
-
254
-
255
-
256
-
257
-
258
-
259
-
260
-
261
-
262
-
263
-
264
-
265
-
266
-
267
-
268
-
269
-
270
-
271
-
272
-
273
-
274
-
275
-
276
-
277
-
278
-
279
-
280
-
281
-
282
-
283
-
284
-
285
-
286
-
287
-
288
-
289
-
290
-
291
-
292
-
293
-
294
-
295
-
296
-
297
-
298
-
299
-
300
-
301
-
302
-
303
-
304
-
305
-
306
-
307
-
308
-
309
-
310
-
311
-
312
-
313
-
314
-
315
-
316
-
317
-
318
-
319
-
320
-
321
-
322
-
323
-
324
-
325
-
326
-
327
-
328
-
329
-
330
-
331
-
332
-
333
-
334
 |
 |
Setting am/pm
Select "AM/PM" option, by pressing button (1) or (2).
Once function is highlighted, press CONFIRM MENU
button (4).
The indication starts flashing.
Select AM or PM, by pressing button (1) or (2),
respectively.
Once you reach the value to be set, press CONFIRM
MENU button (4) and the setting will stop flashing.
To exit the menu and go back to previous page, select
EXIT and press button (4).
Note
Every time the battery is disconnected, the
clock is reset and must be set again by the user.
CLOCK SETTING
11:57
a.m.
12
1
2
3
4
5
6
7
8
9
10
1
HOUR
MINUTE
AM/PM
Fig 111
CLOCK SETTING
11:57
a.m.
12
1
2
3
4
5
6
7
8
9
10
1
HOUR
MINUTE
AM/PM
Fig 112
200