3Com 3C16476A User Guide - Page 27
Configuring the Switch, Configuration Overview, Device Summary Information
 |
UPC - 662705475448
View all 3Com 3C16476A manuals
Add to My Manuals
Save this manual to your list of manuals |
Page 27 highlights
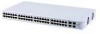
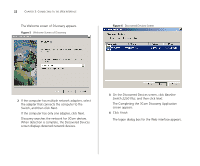
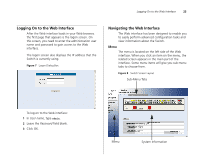
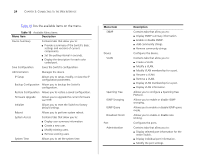
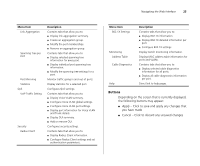
4 CONFIGURING THE SWITCH This chapter provides information on how to configure the Switch's advanced features. Topics include: ■ Device Summary Information ■ Administration Settings ■ Configuring VLANs ■ Configuring Port Settings ■ QoS VoIP Traffic Settings ■ Security ■ Monitoring Configuration Overview The Switch is shipped ready for use. If you only want the Switch to function as a basic layer 2 switch, you do not need to access the Web interface and configure the Switch. You only need to access the Web interface if you want to: ■ Set the administration password to the Web interface ■ Assign an IP address to the Switch ■ Configure the Switch's advanced features ■ Upgrade the firmware Device Summary Information The Device Summary screen, which automatically loads after you log on to the Web interface, provides a snapshot of the Switch's basic settings and versions of current components. Click Device Summary on the menu. A screen appears with three tabs that include: ■ Device View ■ Polling Interval ■ Color Key Device View Contains fields that display the system, switch, and management switch information to identify the Switch. The fields include Product Description, System Location, System Contact, Serial Number, Product 3C Number, MAC Address, Software Version, Unit Uptime, Bootroom Version, and Hardware Version.
-
 1
1 -
2
-
3
-
4
-
5
-
6
-
7
-
8
-
9
-
10
-
11
-
12
-
13
-
14
-
15
-
16
-
17
-
18
-
19
-
20
-
21
-
 22
22 -
 23
23 -
 24
24 -
 25
25 -
 26
26 -
 27
27 -
 28
28 -
 29
29 -
 30
30 -
 31
31 -
 32
32 -
33
-
34
-
35
-
36
-
37
-
38
-
39
-
40
-
41
-
42
-
43
-
44
-
45
-
46
-
47
-
48
-
49
-
50
-
51
-
52
-
53
-
54
-
55
-
56
-
57
-
58
-
59
-
60
-
61
-
62
-
63
-
64
-
65
-
66
-
67
-
68
-
69
-
70
-
71
-
72
-
73
-
74
-
75
-
76
-
77
-
78
-
79
 |
 |
