ATI X1900GT User Guide - Page 59
All Settings, Let the Application Decide, Control, Adaptive Anti-Aliasing
 |
UPC - 727419413008
View all ATI X1900GT manuals
Add to My Manuals
Save this manual to your list of manuals |
Page 59 highlights
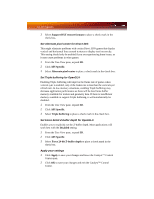
All Settings 51 This page is useful when it is not necessary to preview the adjusted settings because the effect is already known or understood. Set the Anti-aliasing preference manually 1 From the Tree View pane, expand 3D. 2 Click All Settings. 3 Ensure the application override is disabled. To do so, make sure the Let the Application Decide check box is cleared. The slider control will become available. 4 Click the Control slider and move the selector to your preferred setting: • To increase processing performance, move the slider to the left. • To increase image quality, move the slider to the right. Set the level of adaptive anti-aliasing 1 From the Tree View pane, expand 3D. 2 Click Adaptive Anti-Aliasing. 3 Adjust the Adaptive Anti-Aliasing control slider to the desired setting. Set the Anisotropic Filtering preference manually 1 From the Tree View pane, expand 3D. 2 Click All Settings. 3 Ensure the application override is disabled. To do so, make sure the Let the Application Decide check box is cleared. The slider control will become available. 4 Click the Control slider and move the selector to your preferred setting: • To increase processing performance, move the slider to the left. • To increase image quality, move the slider to the right. Set the Anisotropic Filtering to automated preference 1 From the Tree View pane, expand 3D. 2 Click All Settings. 3 Ensure the application override is enabled. To do so, make sure the Let the Application Decide check box is selected.
-
 1
1 -
2
-
3
-
4
-
5
-
6
-
7
-
8
-
9
-
10
-
11
-
12
-
13
-
14
-
15
-
16
-
17
-
18
-
19
-
20
-
21
-
22
-
23
-
24
-
25
-
26
-
27
-
28
-
29
-
30
-
31
-
32
-
33
-
34
-
35
-
36
-
37
-
38
-
39
-
40
-
41
-
42
-
43
-
44
-
45
-
46
-
47
-
48
-
49
-
50
-
51
-
52
-
53
-
 54
54 -
 55
55 -
 56
56 -
 57
57 -
 58
58 -
 59
59 -
 60
60 -
 61
61 -
 62
62 -
 63
63 -
 64
64 -
65
-
66
-
67
-
68
-
69
-
70
-
71
-
72
-
73
-
74
-
75
-
76
-
77
-
78
-
79
-
80
-
81
-
82
-
83
-
84
-
85
-
86
-
87
-
88
-
89
-
90
-
91
-
92
-
93
-
94
-
95
-
96
-
97
-
98
-
99
 |
 |
