Acer Aspire 9500 Service Guide - Page 69
Disassemble the LCD Module, Then take the LCD bracket from the panel.
 |
View all Acer Aspire 9500 manuals
Add to My Manuals
Save this manual to your list of manuals |
Page 69 highlights
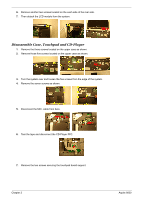
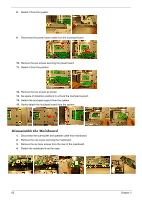
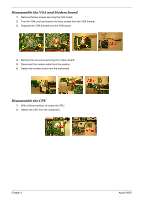
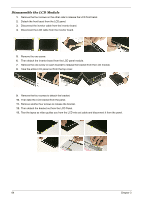
Disassemble the LCD Module 1. Remove the four screws on the other side to release the LCD front bezel. 2. Detach the front bezel from the LCD panel. 3. Disconnect the invertor cable from the invertor board. 4. Disconnect the LCD cable from the invertor board. 5. Remove the one screw. 6. Then detach the invertor board from the LCD panel module. 7. Remove the one screw on each bracket to release the bracket from the LCD module. 8. Take the entire LCD panel out from the top cover. 9. Remove the four screws to detach the bracket. 10. Then take the LCD bracket from the panel. 11. Remove another four screws to release the bracket. 12. Then detach the bracket out from the LCD Panel. 13. Tear the tapes as video guides you from the LCD wire set cable and disconnect it from the panel. 64 Chapter 3
-
 1
1 -
2
-
3
-
4
-
5
-
6
-
7
-
8
-
9
-
10
-
11
-
12
-
13
-
14
-
15
-
16
-
17
-
18
-
19
-
20
-
21
-
22
-
23
-
24
-
25
-
26
-
27
-
28
-
29
-
30
-
31
-
32
-
33
-
34
-
35
-
36
-
37
-
38
-
39
-
40
-
41
-
42
-
43
-
44
-
45
-
46
-
47
-
48
-
49
-
50
-
51
-
52
-
53
-
54
-
55
-
56
-
57
-
58
-
59
-
60
-
61
-
62
-
63
-
 64
64 -
 65
65 -
 66
66 -
 67
67 -
 68
68 -
 69
69 -
 70
70 -
 71
71 -
 72
72 -
 73
73 -
 74
74 -
75
-
76
-
77
-
78
-
79
-
80
-
81
-
82
-
83
-
84
-
85
-
86
-
87
-
88
-
89
-
90
-
91
-
92
-
93
-
94
-
95
-
96
-
97
-
98
-
99
-
100
-
101
-
102
-
103
-
104
-
105
-
106
-
107
-
108
-
109
-
110
-
111
-
112
-
113
-
114
-
115
-
116
-
117
-
118
-
119
-
120
-
121
-
122
-
123
-
124
-
125
-
126
-
127
-
128
-
129
 |
 |
