Samsung SCX 4725FN User Manual (ENGLISH) - Page 48
Using the advanced fax features, Advanced fax options, Printing sent fax report automatically
 |
UPC - 635753613117
View all Samsung SCX 4725FN manuals
Add to My Manuals
Save this manual to your list of manuals |
Page 48 highlights
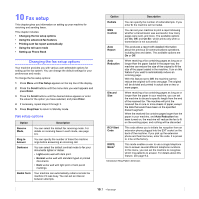
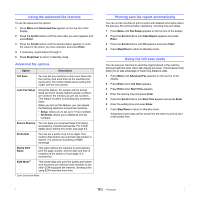
Using the advanced fax features To use the advanced fax options: 1 Press Menu until Advanced Fax appears on the top line of the display. 2 Press the Scroll buttons until the menu item you want appears and press Enter. 3 Press the Scroll buttons until the desired status appears or enter the value for the option you have selected, and press Enter. 4 If necessary, repeat steps 2 through 3. 5 Press Stop/Clear to return to Standby mode. Advanced fax options Option Description Toll Save You can set you machine to store your faxes into the memory and send them at the specified tollsaving time. For further details about setting this mode, see the next column. Junk Fax Setup Using this feature, the system will not accept faxes sent from remote stations whose numbers are stored in the memory as junk fax numbers. This feature is useful for blocking any unwanted faxes. When you turn on this feature, you can access the following options to set junk fax numbers. • Setup: allows you to set up to 10 fax numbers. • All Delete: allows you to delete all junk fax numbers. Secure Receive You can keep your received faxes from being accessed by unauthorized people. For further details about setting this mode, see page 9.4. Prefix Dial You can set a prefix of up to five digits. This number dials before any automatic dial number is started. It is useful for accessing a PABX exchange. Stamp RCV Name ECM Mode1 This option allows the machine to automatically print the page number, and the date and time of reception at the bottom of each page of a received fax. This mode helps with poor line quality and makes sure any faxes you send are sent smoothly to any other ECM-equipped fax machine. Sending a fax using ECM may take more time. 1. Error Correction Mode Printing sent fax report automatically You can set the machine to print a report with detailed information about the previous 50 communication operations, including time and dates. 1 Press Menu until Fax Setup appears on the top line of the display. 2 Press the Scroll buttons until Auto Report appears and press Enter. 3 Press the Scroll buttons until On appears and press Enter. 4 Press Stop/Clear to return to Standby mode. Using the toll save mode You can set your machine to send the original stored in the memory during preset time slots, when call charges are lower. This toll save mode helps you to take advantage of lower long distance rates. 1 Press Menu until Advanced Fax appears on the top line of the display. 2 Press Enter when Toll Save appears. 3 Press Enter when Start Time appears. 4 Enter the starting time and press Enter. 5 Press the Scroll buttons until End Time appears and press Enter. 6 Enter the ending time and press Enter. 7 Press Stop/Clear to return to Standby mode. Subsequent sent faxes will be stored into the memory and be sent at the preset time. 10.2
-
 1
1 -
2
-
3
-
4
-
5
-
6
-
7
-
8
-
9
-
10
-
11
-
12
-
13
-
14
-
15
-
16
-
17
-
18
-
19
-
20
-
21
-
22
-
23
-
24
-
25
-
26
-
27
-
28
-
29
-
30
-
31
-
32
-
33
-
34
-
35
-
36
-
37
-
38
-
39
-
40
-
41
-
42
-
 43
43 -
 44
44 -
 45
45 -
 46
46 -
 47
47 -
 48
48 -
 49
49 -
 50
50 -
 51
51 -
 52
52 -
 53
53 -
54
-
55
-
56
-
57
-
58
-
59
-
60
-
61
-
62
-
63
-
64
-
65
-
66
-
67
-
68
-
69
-
70
-
71
-
72
-
73
-
74
-
75
-
76
-
77
-
78
-
79
-
80
-
81
-
82
-
83
-
84
-
85
-
86
-
87
-
88
-
89
-
90
-
91
-
92
-
93
-
94
-
95
-
96
-
97
-
98
-
99
-
100
-
101
-
102
-
103
-
104
-
105
-
106
-
107
-
108
-
109
-
110
-
111
-
112
-
113
-
114
-
115
-
116
-
117
-
118
-
119
-
120
-
121
 |
 |
