Alesis MultiMix 8 USB FX User Manual - Page 18
Fig. 21, Fig. 21, Fig. 21, Record, Important, Operation Manual, Documentation, Getting, Started, - manual for
 |
View all Alesis MultiMix 8 USB FX manuals
Add to My Manuals
Save this manual to your list of manuals |
Page 18 highlights
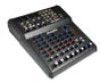
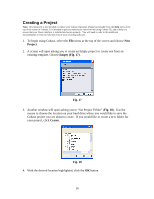
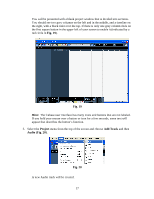
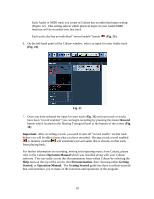
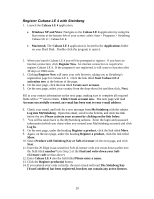
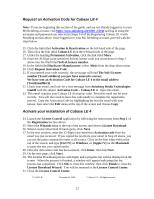
Each Audio or MIDI track you create in Cubase has an individual input setting (Figure 12). This setting selects which physical input on your Audio/MIDI interface will be recorded onto that track. Each track also has an individual "record enable" button (Fig. 21) 6. On the left-hand panel of the Cubase window, select an input for your Audio track (Fig. 21) Fig. 21 7. Once you have selected the input for your track (Fig. 21) and your track or tracks have been "record enabled," you can begin recording by pressing the master Record button which located on the floating Transport Panel at the bottom of the screen (Fig. 19). Important: After recording a track, you need to turn off "record enable" on that track before you will be able to hear what you have recorded. Having a track record enabled or monitor enabled will sometimes prevent audio that is already on that track from playing back. For further information on recording, mixing and exporting music from Cubase, please refer to the Cubase Operation Manual which was installed along with your Cubase software. You can easily access this documentation from within Cubase by selecting the Help menu at the top of the screen, then Documentation, then choosing either Getting Started, or Operation Manual. The Getting Started guide has three excellent tutorials that will introduce you to many of the functions and operations of the program. 18
-
 1
1 -
2
-
3
-
4
-
5
-
6
-
7
-
8
-
9
-
10
-
11
-
12
-
 13
13 -
 14
14 -
 15
15 -
 16
16 -
 17
17 -
 18
18 -
 19
19 -
 20
20 -
 21
21
 |
 |