Alesis Strike Drum Module Strike Pro Performance Drum Module - User Guide v1.5 - Page 24
Editing Samples, Editing Kits, Editing, Voices
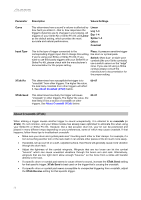
 |
View all Alesis Strike Drum Module manuals
Add to My Manuals
Save this manual to your list of manuals |
Page 24 highlights
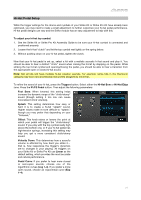
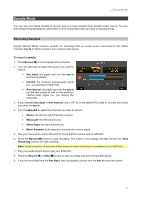
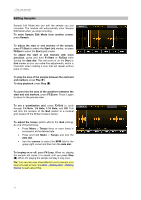
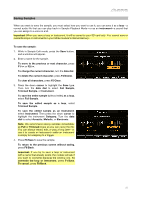
Editing Samples Sample Edit Mode lets you edit the sample you just recorded. The module will automatically enter Sample Edit Mode when you stop recording. To enter Sample Edit Mode from another screen, press Sample. To adjust the start or end markers of the sample, press F1/Start to select the Start (left) marker, or press F2/End to select the End (right) marker. To adjust the start or end markers with more precision, press and hold F1/Start or F2/End while turning the data dial. This will zoom in on the Start or End marker so you can make fine adjustments, which is important when creating a loop that will repeat without pops or clicks. To play the area of the sample between the start and end markers, press Play (). To stop playback, press Stop (). To zoom into the area of the waveform between the start and end markers, press F5/Zoom. Press it again to return to the preview view. To set a quantization grid, press F3/Grid to cycle through 1/4 Note, 1/8 Note, 1/16 Note, and Off. This will lock the location of the End marker to a musical grid, based off the Strike module's tempo. To adjust the tempo (which affects the Grid setting), do one of the following: • Press Metro > Tempo three or more times in succession at the desired rate. • Press and hold Metro > Tempo and turn the data dial. • Use the cursors to select the BPM field in the upper-right corner and then turn the data dial. To looping on or off, press F4/Loop. When on, playing the sample will cause it to repeat until you press Stop (). When off, playing the sample will play it only once. Tip: You can also use Voice Mode to set a sample on a layer of a pad to loop. See Kits > Editing Kits > Editing Voices to learn about this. 24
-
 1
1 -
2
-
3
-
4
-
5
-
6
-
7
-
8
-
9
-
10
-
11
-
12
-
13
-
14
-
15
-
16
-
17
-
18
-
 19
19 -
 20
20 -
 21
21 -
 22
22 -
 23
23 -
 24
24 -
 25
25 -
 26
26 -
 27
27 -
 28
28 -
 29
29 -
30
-
31
-
32
 |
 |
