Alpine INE-W940 Owner's Manual - Audio (english) - Page 36
Adjusting the Subwoofer Level, Lowering Subwoofer Level Temporarily, Setting the Subwoofer Phase
 |
View all Alpine INE-W940 manuals
Add to My Manuals
Save this manual to your list of manuals |
Page 36 highlights
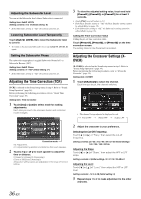
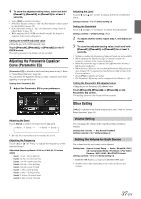
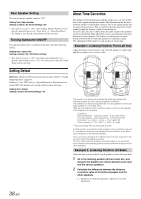
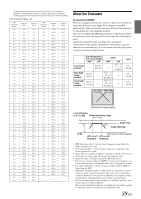
Adjusting the Subwoofer Level You can set the Subwoofer level when a Subwoofer is connected. Setting item: SubW. LEVEL Setting contents: 0 to 15 (Initial setting: 0) • If the Subwoofer setting is "Off," the setting cannot be set. Lowering Subwoofer Level Temporarily Touch [Sub W. LEVEL 0] to lower the Subwoofer level to Level 0. • To return to the previous Subwoofer level, touch [Sub W. LEVEL 0] again. Setting the Subwoofer Phase The subwoofer output phase is toggled Subwoofer Normal (0°) or Subwoofer Reverse (180°). Setting item: SubW. Phase Setting contents: 0° / 180° (Initial setting: 0°) • If the Subwoofer setting is "Off," the setting cannot be set. Adjusting the Time Correction (TCR) [TCR] is selected on the Sound setup menu in step 3. Refer to "Sound Setup Operation" (page 34). Before performing the following procedures, refer to "About Time Correction" (page 38). Setting item: Time Correction 1 Touch [ms] or [cm] to select mode for making adjustments. Each time you touch, the onscreen button and correction mode changes. 3 To store the adjusted setting value, touch and hold [Preset1], [Preset2], or [Preset3] for at least 2 seconds. • Touch [Flat] to set all values to 0.0. • If the Rear Speaker setting is "Off," the Rear Speaker setting cannot be edited (Refer to page 38). • If the Subwoofer setting is "Off," the Subwoofer setting cannot be edited (Refer to page 38). Calling the Time Correction Value Calling the pre-set time correction value. Touch [Preset1], [Preset2], or [Preset3] on the time correction screen. The setting stored in the Preset will be recalled. Adjusting the Crossover Settings (XOVER) [X-OVER] is selected on the Sound setup menu in step 3. Refer to "Sound Setup Operation" (page 34). Before performing the following procedures, refer to "About the Crossover" (page 39). Setting item: X-OVER 1 Touch [Channel] to select the channel. Each time you touch, the channel switches. • The channel being adjusted is displayed in red. Front HPF Rear HPF Subw. LPF Correction mode ms: Adjust time. cm: Adjust listening position and distance from each speaker. 2 Touch [ ] or [ ] for each speaker to adjust the time or distance. 0.0msec to 9.9msec (0.1msec/step) 0.0cm to 336.6cm (3.4cm/step) All speaker setting values are adjustable in the range of 15ms or 510cm. 2 Adjust the crossover to your preference. Selecting the Cut-Off Frequency Touch [ ] or [ ] of "Freq.," then select the cut-off frequency. Setting contents: 20 / 25 / 31.5 / 40 / 50 / 63 / 80 (Initial setting) / 100 / 125 / 160 / 200 Hz Adjusting the Slope Touch [ ] or [ ] of "Slope," then adjust the HPF or LPF slope. Setting contents: 0 (Initial setting) / 6 / 12 / 18 / 24 dB/oct Adjusting the Level Touch [ ] or [ ] of "Level," then adjust the HPF or LPF level. Setting contents: -12 to 0 dB (Initial setting: 0) 3 Repeat steps 1 to 2 to make adjustment to the other channels. 36-EN
-
 1
1 -
2
-
3
-
4
-
5
-
6
-
7
-
8
-
9
-
10
-
11
-
12
-
13
-
14
-
15
-
16
-
17
-
18
-
19
-
20
-
21
-
22
-
23
-
24
-
25
-
26
-
27
-
28
-
29
-
30
-
 31
31 -
 32
32 -
 33
33 -
 34
34 -
 35
35 -
 36
36 -
 37
37 -
 38
38 -
 39
39 -
 40
40 -
 41
41 -
42
-
43
-
44
-
45
-
46
-
47
-
48
-
49
-
50
-
51
-
52
-
53
-
54
-
55
-
56
-
57
-
58
-
59
-
60
-
61
-
62
-
63
-
64
-
65
-
66
-
67
-
68
-
69
-
70
-
71
-
72
-
73
-
74
-
75
-
76
-
77
-
78
-
79
-
80
-
81
-
82
-
83
-
84
-
85
-
86
-
87
-
88
-
89
-
90
-
91
-
92
-
93
-
94
-
95
-
96
-
97
 |
 |