Alpine iLX-107 Owners Manual - Page 22
Application Setup
 |
View all Alpine iLX-107 manuals
Add to My Manuals
Save this manual to your list of manuals |
Page 22 highlights
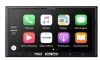
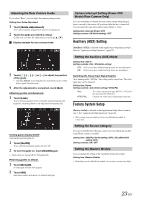
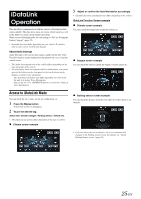
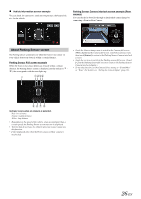
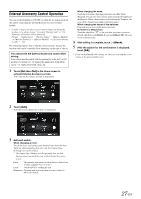
Initializing the System You can initialize all data, to restore the factory settings. Remove the USB Flash memory, from the system before operation Setting item: Clear All Settings 1 Touch [RESET] of "Clear All Settings". 2 After the confirmation message appears, touch [OK]. The system starts initialization. • Do not turn on/off the power, change the ignition key position or remove the screen panel until system restart is completed. 1 Touch [ ] on the Home screen. The Setup main screen is displayed. 2 Touch [Application]. The Application Setup screen appears. 3 Select the desired item. If " " appears, there is another hierarchy level. Touch the desired item. If " " does not appear, proceed to step 4. Demonstration Setup [Demo mode] is selected on the General setup menu in step 3. Refer to "General Setup Operation" (page 20). Canceling the Demonstration This unit has a Demonstration feature for the display. To start demo mode, set Demo mode to ON. Setting item: Demo mode Setting contents: OFF (Initial setting) / ON • If you perform an operation during the Demo mode, the demonstration is temporarily stopped. Application Setup Application Setup Operation To display the Application Setup Menu screen: Your vehicle must be parked with the ignition key in the ACC or ON position. To do this, follow the procedures below. 1 Bring your vehicle to a complete stop at a safe location. Engage the parking brake. 2 Release the parking brake. (For safety, release the parking brake while depressing the foot brake pedal). 3 Engage the parking brake again. • For automatic transmission vehicles, place the transmission lever in the Park position. Now, the locking system for the Setup operation has been released. Engaging the parking brake can reactivate the Application Setup Menu, as long as the car's ignition has not been turned off. It is not necessary to repeat the above procedure (1 through 3) of "To display the Application Setup Menu screen". Each time the ignition is turned OFF, perform the procedure of "To display the Application Setup Menu screen". The following steps 1 to 5 are common operations to each "Setting item" of Application Setup. Refer to each section for details. Setting items: Camera / Auxiliary (AUX) / Factory Audio / Apple CarPlay / External Accessory Ctrl 4 Touch [ ] or [ ] etc., to change its setting. 5 Touch [ ] to return to the main application screen. Touch [ ] to return to the previous screen. • Immediately after changing the Application Setup (while the system is writing data automatically) do not turn the ignition key to OFF. Otherwise, the settings may not be changed. Camera Setting [Camera] is selected on the Application setup menu in step 3. Refer to "Application Setup Operation" (page 22). Setting the Camera Input With an optional camera connected, its video is output to the monitor. When the camera is connected, set this item. Setting item: Position Setting contents: Off (Initial setting) / Front / Side / Rear Front: Side: Rear: Front camera Side camera Rear camera After selecting "Rear", "Front" or "Side" in the "Position" setting, touch [Position], the following additional items can be adjusted. Setting the Camera Signal Input When the camera is connected, the video input signal type can be selected. Further setting item: Camera Signal Setting contents: NTSC (Initial setting) / PAL NTSC/PAL: Choose the video input signal type manually. 22-EN
-
 1
1 -
2
-
3
-
4
-
5
-
6
-
7
-
8
-
9
-
10
-
11
-
12
-
13
-
14
-
15
-
16
-
 17
17 -
 18
18 -
 19
19 -
 20
20 -
 21
21 -
 22
22 -
 23
23 -
 24
24 -
 25
25 -
 26
26 -
 27
27 -
28
-
29
-
30
-
31
-
32
-
33
-
34
-
35
-
36
-
37
-
38
-
39
-
40
-
41
 |
 |
