Alpine iLX-107 Owners Manual - Page 23
Auxiliary AUX Setting, Factory System Setup
 |
View all Alpine iLX-107 manuals
Add to My Manuals
Save this manual to your list of manuals |
Page 23 highlights
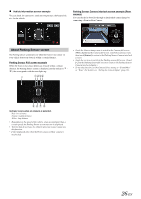
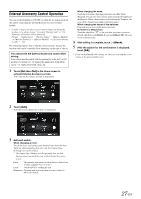
Adjusting the Rear Camera Guide If you select "Rear," you can adjust the camera guide position. Setting item: Guide Adjustment 1 Touch [Guide Adjustment]. The camera guide adjustment screen is displayed. 2 Touch the guide you intend to adjust. Guide line can also be selected by touching [ ] [ ]. Display example for rear camera mode 3 Touch or [ ] to adjust the position of the guide. • Touching [Clear] clears adjustments and returns to the setting before guide line alteration. 4 After the adjustment is completed, touch [Set]. Adjusting guides simultaneously 1 Touch [Link]. The 3 vertical guides of the currently-selected guide link together, allowing them to be adjusted simultaneously. Turning guide display On/Off Turning the selected guide off. 1 Touch [On/Off]. The currently selected guide will turn off. 2 To turn the guide on, touch [On/Off] again. • Guides that are turned off are still adjustable. Returning guides to default. 1 Touch [Default]. A message window will appear. 2 Touch [OK]. Adjusted values will return to default settings. Camera Interrupt Setting (Power OFF Mode) (Rear Camera Only) You can set whether to display the rear camera image when the gear lever is moved to the reverse (R) position while the unit is turned off. You can select this item only when Camera Select is "Rear." Setting item: Interrupt (Power OFF) Setting contents: ON (Initial setting) / OFF Auxiliary (AUX) Setting [Auxiliary (AUX)] is selected on the Application setup menu in step 3. Refer to "Application Setup Operation" (page 22). Setting the Auxiliary (AUX) Mode Setting item: AUX In Setting contents: OFF / ON (Initial setting) OFF: AUX source and related setting items are not displayed. ON: AUX source and related setting items are displayed. Switching the Visual Input Signal System After turning on the "AUX In", this setting can be carried out. The video input type can be changed. Setting item: Signal Setting contents: Auto (Initial setting) / NTSC/PAL Auto: NTSC/PAL: The video input signal type (NTSC or PAL) will be automatically selected. Choose the video input signal type manually. Factory System Setup [Factory Audio] is selected on the Application Setup Menu screen in step 3. See "Application Setup Operation" (page 22). • This setting item not displayed when no iDataLink module is connected. Setting the Source Category You can set whether the following source icon from iDataLink module in the Home screen is available. Setting item: USB/iPod (Initial setting: OFF) / SiriusXM (Initial setting: OFF) Setting contents: ON / OFF Setting the Maestro Module You can change the setting of the connected iDataLink module. Setting item: Maestro Module • Depending on the iDataLink module, the setting contents may differ. 23-EN
-
 1
1 -
2
-
3
-
4
-
5
-
6
-
7
-
8
-
9
-
10
-
11
-
12
-
13
-
14
-
15
-
16
-
17
-
 18
18 -
 19
19 -
 20
20 -
 21
21 -
 22
22 -
 23
23 -
 24
24 -
 25
25 -
 26
26 -
 27
27 -
 28
28 -
29
-
30
-
31
-
32
-
33
-
34
-
35
-
36
-
37
-
38
-
39
-
40
-
41
 |
 |
