Alpine iLX-107 Owners Manual - Page 31
Installation
 |
View all Alpine iLX-107 manuals
Add to My Manuals
Save this manual to your list of manuals |
Page 31 highlights
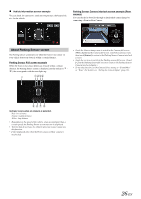
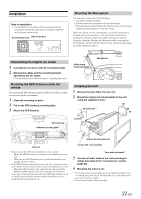
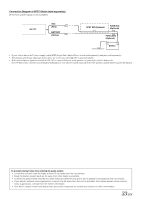
Installation Note on installation • Do not block the unit's fan, which would prevent air circulation. If blocked, heat will accumulate inside the unit and may cause a fire. Air Ventialtion hole Rear of the Unit Mounting the Microphone. For safe use, make sure of the following: • Location is stable and firm. • Driver's view and operations are not obstructed. • Microphone is located where the driver's voice can be easily picked up (for example, on the sun visor). When you speak into the microphone, you should not have to change your driving posture. This may cause a distraction, taking your attention away from safely driving your vehicle. Carefully consider direction and distance while mounting the microphone. Confirm that the driver's voice can be easily picked up at the selected location. Uninstalling the original car stereo 1 Uninstall the car stereo with its mounting bracket. 2 Remove the cables and the mounting bracket attached to the car stereo. (The mounting bracket will be used in "Installing the unit".) Mounting the GPS Antenna inside the vehicle Please mount the GPS Antenna properly as follow procedures to make sure the unit's perfect performance. 1 Clean the mounting location. 2 Put on the GPS Antenna mounting plate. 3 Mount the GPS Antenna. Cable clamp (Sold separately) Microphone Installing the Unit 1 Remove the Face Plate from the unit. 2 Mount the original mounting bracket to the unit using the supplied screws. Ground Lead*1 GPS Antenna Antenna mounting plate Chassis This unit • Do not mount the GPS Antenna inside the center console. - Mount the GPS Antenna on a flat plane of the dash board or rear tray. - Make sure the GPS Antenna is not covered (obstructed) by any metallic surface or object. • If the GPS Antenna is mounted near the unit, the reception becomes poor, and the location of your vehicle may not be displayed correctly. - Mount the GPS Antenna as far away from the unit as possible. - Bundle the GPS Antenna cable away from the rear of the unit. • Some types of thermal glass may block the GPS radio frequencies. If reception is poor with the antenna installed inside the car, try to mount the antenna outside the car. Original Mounting Bracket Screws (M5 × 8) (Included) Face plate (Included)*2 3 Connect all other leads of the unit according to details described in the "Connections" section (page 34). 4 Mounting the unit in a car. *1 To securely connect the ground lead, use an already installed screw on a metal part of the vehicle (marked ( )) or a clean, bare metal spot on the vehicle's chassis. *2 Use the removed Face Plate if needed. 31-EN
-
 1
1 -
2
-
3
-
4
-
5
-
6
-
7
-
8
-
9
-
10
-
11
-
12
-
13
-
14
-
15
-
16
-
17
-
18
-
19
-
20
-
21
-
22
-
23
-
24
-
25
-
 26
26 -
 27
27 -
 28
28 -
 29
29 -
 30
30 -
 31
31 -
 32
32 -
 33
33 -
 34
34 -
 35
35 -
 36
36 -
37
-
38
-
39
-
40
-
41
 |
 |
