Archos AV340 User Manual - Page 8
Ports, Buttons, and Connections - charger
 |
UPC - 690590505216
View all Archos AV340 manuals
Add to My Manuals
Save this manual to your list of manuals |
Page 8 highlights
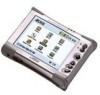
1 Ports, Buttons, and Connections Built-in microphone Line & external microphone audio input Headphone & AV output CHG: AC adapter is connected ON: Unit is on HDD: Hard Disk being accessed Expansion Port Remove rubber cap to reveal Mini-Centronics port for add-ons such as Camera, FM Remote control, Digital Video Recorder, Firewire interface, etc. TFT Screen 320 x 240 pixels (QVGA) Functions Display & Buttons These three function buttons actuate the associated functions displayed on the bottom of the screen. Play/Pause/Enter/On Play the currently selected item, pause, and play again. Long press, turns on the AV300. Long press to switch between external and built-in video. Stop/Esc/Off Stop currently playing file. Escape from current operation. Long press to shut off. Joystick Move, select or Adjust Left, right, up, or down. A. Headphone AV out: television output (use ARCHOS AV cable), audio stereo, and headphone jack. B. Audio In: audio Stereo Analog Line-in & microphone in & Audio Stereo SPDIF Digital In/out C. Built-in Microphone: be sure you set the recording settings to microphone. Ports, Buttons, and Connections D. USB 2.0 port Insert USB cable mini jack here and attach other end to computer USB port. (USB 1.1 compatible). E. DC In: to power the unit and charge the internal batteries with the external AC adapter/charger. Use ONLY an Archos adapter. F. Factory diagnostic: this is a special port reserved for factory diagnostics. You should not attempt to use this port. 8
-
 1
1 -
2
-
 3
3 -
 4
4 -
 5
5 -
 6
6 -
 7
7 -
 8
8 -
 9
9 -
 10
10 -
 11
11 -
 12
12 -
 13
13 -
14
-
15
-
16
-
17
-
18
-
19
-
20
-
21
-
22
-
23
-
24
-
25
-
26
-
27
-
28
-
29
-
30
-
31
-
32
-
33
-
34
-
35
-
36
-
37
-
38
-
39
-
40
-
41
-
42
-
43
-
44
-
45
-
46
-
47
-
48
-
49
-
50
-
51
-
52
 |
 |
