Asus AP1710-E1 AP1710-E1 English version manual - Page 88
installed when it is parallel
 |
View all Asus AP1710-E1 manuals
Add to My Manuals
Save this manual to your list of manuals |
Page 88 highlights
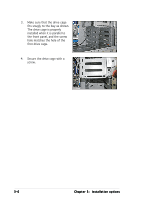
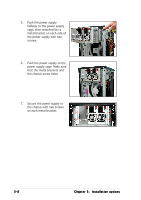
3. Make sure that the drive cage fits snugly to the bay as shown. The drive cage is properly installed when it is parallel to the front panel, and the screw hole matches the hole of the first drive cage. 4. Secure the drive cage with a screw. 3-6 Chapter 3: Installation options
-
 1
1 -
2
-
3
-
4
-
5
-
6
-
7
-
8
-
9
-
10
-
11
-
12
-
13
-
14
-
15
-
16
-
17
-
18
-
19
-
20
-
21
-
22
-
23
-
24
-
25
-
26
-
27
-
28
-
29
-
30
-
31
-
32
-
33
-
34
-
35
-
36
-
37
-
38
-
39
-
40
-
41
-
42
-
43
-
44
-
45
-
46
-
47
-
48
-
49
-
50
-
51
-
52
-
53
-
54
-
55
-
56
-
57
-
58
-
59
-
60
-
61
-
62
-
63
-
64
-
65
-
66
-
67
-
68
-
69
-
70
-
71
-
72
-
73
-
74
-
75
-
76
-
77
-
78
-
79
-
80
-
81
-
82
-
 83
83 -
 84
84 -
 85
85 -
 86
86 -
 87
87 -
 88
88 -
 89
89 -
 90
90 -
 91
91 -
 92
92 -
 93
93 -
94
-
95
-
96
-
97
-
98
-
99
-
100
-
101
-
102
-
103
-
104
-
105
-
106
-
107
-
108
-
109
-
110
-
111
-
112
-
113
-
114
-
115
-
116
-
117
-
118
-
119
-
120
-
121
-
122
-
123
-
124
-
125
-
126
-
127
-
128
-
129
-
130
-
131
-
132
-
133
-
134
-
135
-
136
-
137
-
138
-
139
-
140
-
141
-
142
-
143
-
144
-
145
-
146
-
147
-
148
-
149
-
150
-
151
-
152
-
153
-
154
-
155
-
156
-
157
-
158
 |
 |

Chapter 3:
Installation options
Chapter 3:
Installation options
Chapter 3:
Installation options
Chapter 3:
Installation options
Chapter 3:
Installation options
3-6
3-6
3-6
3-6
3-6
4.
Secure the drive cage with a
screw.
3.
Make sure that the drive cage
fits snugly to the bay as shown.
The drive cage is properly
installed when it is parallel to
the front panel, and the screw
hole matches the hole of the
first drive cage.