Asus AP1710-S5 AP1710-S5 English Manual - Page 20
Chassis cover
 |
View all Asus AP1710-S5 manuals
Add to My Manuals
Save this manual to your list of manuals |
Page 20 highlights
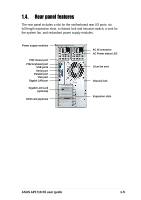
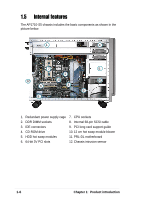
2.1 Chassis cover Before proceeding, prepare a Phillips and a flat head screw drivers that you might need to facilitate installation. 2.1.1 Removing the cover 1. Loosen the two thumb screws that secure the side cover. 2. Slide the side cover for about half an inch toward the rear until it is disengaged from the chassis. 1 2 2.1.2 Installing the cover 1. Match and insert the hooks of the cover to the elongated holes on the side of the chassis. All the six hooks (three each on the top and bottom) of the cover must properly fit the designated holes. 2. Slide the cover toward the front until it snaps in place. 3. Tighten the thumb screws to secure the cover. Hole on the side of the chassis 1 Hook on the cover 3 2 2-2 Chapter 2: Hardware setup
-
 1
1 -
2
-
3
-
4
-
5
-
6
-
7
-
8
-
9
-
10
-
11
-
12
-
13
-
14
-
 15
15 -
 16
16 -
 17
17 -
 18
18 -
 19
19 -
 20
20 -
 21
21 -
 22
22 -
 23
23 -
 24
24 -
 25
25 -
26
-
27
-
28
-
29
-
30
-
31
-
32
-
33
-
34
-
35
-
36
-
37
-
38
-
39
-
40
-
41
-
42
-
43
-
44
-
45
-
46
-
47
-
48
-
49
-
50
-
51
-
52
-
53
-
54
 |
 |
Chapter 2:
Hardware setup
2-2
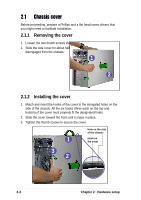
2.1
Chassis cover
Before proceeding, prepare a Phillips and a flat head screw drivers that
you might need to facilitate installation.
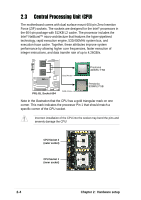
2.1.1
Removing the cover
1.
Loosen the two thumb screws that secure the side cover.
2.
Slide the side cover for about half an inch toward the rear until it is
disengaged from the chassis.
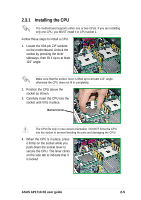
2.1.2
Installing the cover
1.
Match and insert the hooks of the cover to the elongated holes on the
side of the chassis. All the six hooks (three each on the top and
bottom) of the cover must properly fit the designated holes.
2.
Slide the cover toward the front until it snaps in place.
3.
Tighten the thumb screws to secure the cover.
1
2
Hook on
the cover
Hole on the side
of the chassis
1
2
3