Asus AP1710-S5 AP1710-S5 English Manual - Page 24
Installing the heatsink and fan
 |
View all Asus AP1710-S5 manuals
Add to My Manuals
Save this manual to your list of manuals |
Page 24 highlights
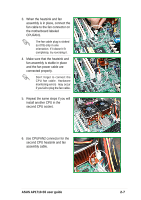
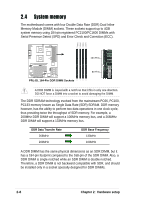
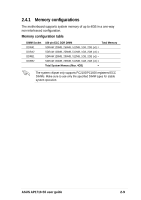
2.3.2 Installing the heatsink and fan The Intel® Xeon™ processors require specially designed heatsink and fan assembly to ensure optimum thermal condition and performance. Make sure that the heatsink with fan assembly is properly installed on the motherboard. A tilted or improperly installed heatsink and fan assembly can cause damage to motherboard CPU socket and/or CPU. To install the CPU heatsink and fan: 1. Place the heatsink with fan assembly on top of the installed CPU. Make sure it fits the screw holes of the heatsink bracket at the bottom of the CPU socket. (The heatsink bracket is pre-installed in the motherboard.) 2. Tighten all four (4) screws. Make sure all screws fit properly in place. Take caution in tightening screws. Do not over-tighten screws, doing so may damage the motherboard! TIP: Follow the sequence shown: half-tighten the screw on one corner of the heatsink and fan, then the next screw on the other corner and so on, making a cross pattern. Repeat until all four screws are tightened properly. 2 4 3 ○ 1 ○ ○○ ○○ ○ ○ ○ ○ ○ ○ Make sure heatsink with fan assembly is mounted properly on the CPU to avoid burning the CPU and/or CPU socket. 2-6 Chapter 2: Hardware setup
-
 1
1 -
2
-
3
-
4
-
5
-
6
-
7
-
8
-
9
-
10
-
11
-
12
-
13
-
14
-
15
-
16
-
17
-
18
-
 19
19 -
 20
20 -
 21
21 -
 22
22 -
 23
23 -
 24
24 -
 25
25 -
 26
26 -
 27
27 -
 28
28 -
 29
29 -
30
-
31
-
32
-
33
-
34
-
35
-
36
-
37
-
38
-
39
-
40
-
41
-
42
-
43
-
44
-
45
-
46
-
47
-
48
-
49
-
50
-
51
-
52
-
53
-
54
 |
 |
