Asus ExpertCenter E500 G9 E500 G9 English User Manual - Page 166
Locate the driver in the corresponding folder of the Support DVD or the USB flash drive, to continue.
 |
View all Asus ExpertCenter E500 G9 manuals
Add to My Manuals
Save this manual to your list of manuals |
Page 166 highlights
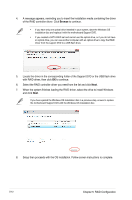
4. A message appears, reminding you to insert the installation media containing the driver of the RAID controller driver. Click Browse to continue. • If you have only one optical drive installed in your system, eject the Windows OS installation disc and replace it with the motherboard Support DVD. • If you created a SATA RAID set and cannot use the optical drive, or if you do not have an optical drive, you can use another computer with an optical drive to copy the RAID driver from the support DVD to a USB flash drive. 5. Locate the driver in the corresponding folder of the Support DVD or the USB flash drive with RAID driver, then click OK to continue. 6. Select the RAID controller driver you need from the list and click Next. 7. When the system finishes loading the RAID driver, select the drive to install Windows and click Next. If you have ejected the Windows OS installation disc in a previous step, ensure to replace the motherboard Support DVD with the Windows OS installation disc. 8. Setup then proceeds with the OS installation. Follow screen instructions to complete. 5-12 Chapter 5: RAID Configuration
-
 1
1 -
2
-
3
-
4
-
5
-
6
-
7
-
8
-
9
-
10
-
11
-
12
-
13
-
14
-
15
-
16
-
17
-
18
-
19
-
20
-
21
-
22
-
23
-
24
-
25
-
26
-
27
-
28
-
29
-
30
-
31
-
32
-
33
-
34
-
35
-
36
-
37
-
38
-
39
-
40
-
41
-
42
-
43
-
44
-
45
-
46
-
47
-
48
-
49
-
50
-
51
-
52
-
53
-
54
-
55
-
56
-
57
-
58
-
59
-
60
-
61
-
62
-
63
-
64
-
65
-
66
-
67
-
68
-
69
-
70
-
71
-
72
-
73
-
74
-
75
-
76
-
77
-
78
-
79
-
80
-
81
-
82
-
83
-
84
-
85
-
86
-
87
-
88
-
89
-
90
-
91
-
92
-
93
-
94
-
95
-
96
-
97
-
98
-
99
-
100
-
101
-
102
-
103
-
104
-
105
-
106
-
107
-
108
-
109
-
110
-
111
-
112
-
113
-
114
-
115
-
116
-
117
-
118
-
119
-
120
-
121
-
122
-
123
-
124
-
125
-
126
-
127
-
128
-
129
-
130
-
131
-
132
-
133
-
134
-
135
-
136
-
137
-
138
-
139
-
140
-
141
-
142
-
143
-
144
-
145
-
146
-
147
-
148
-
149
-
150
-
151
-
152
-
153
-
154
-
155
-
156
-
157
-
158
-
159
-
160
-
 161
161 -
 162
162 -
 163
163 -
 164
164 -
 165
165 -
 166
166 -
 167
167 -
 168
168 -
 169
169 -
 170
170 -
 171
171 -
172
-
173
-
174
-
175
-
176
-
177
-
178
-
179
-
180
-
181
-
182
-
183
-
184
-
185
-
186
 |
 |
