Asus M1A M1 Series Manual - Page 26
Installing and Removing the Battery Pack
 |
View all Asus M1A manuals
Add to My Manuals
Save this manual to your list of manuals |
Page 26 highlights
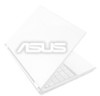
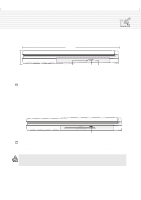
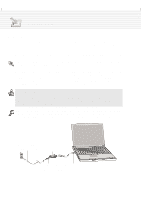
3. Getting Started Installing and Removing the Battery Pack Your Notebook PC may or may not have its battery pack installed. If your Notebook PC does not have its battery pack installed, there will be a large opening at the bottom of the Notebook PC. Use the following procedures to install or remove the battery pack. To install the battery pack: 1. Unlock the battery and drive lock 2 first. 2. Insert the battery pack with the connector first (see "Partially Removed Battery" illustration). 3. Snap the battery pack into the Notebook PC and slide the battery and drive lock towards the rear to secure the battery from unlock to lock in the opposite direction of the arrow as shown in the illustration. To remove the battery pack: 1. Unlock the battery by sliding the battery and drive lock towards the front of the Notebook PC (from lock to unlock in direction of the arrow as shown in the illustration). 2. Slide the battery release latch towards the rear of the Notebook PC and the battery pack will raise out of the Notebook PC (in direction of the arrow as shown in the illustration). Battery & Battery Lock Unlock WARNING! Never attempt to remove the battery pack while the Notebook PC is turned ON, as this may result in the loss of working data. Installed Battery Partially Removed Battery WARNING! Only use battery packs and power adapters supplied with this Notebook PC or specifically approved by the manufacturer or retailer for use with this model. 26
-
 1
1 -
2
-
3
-
4
-
5
-
6
-
7
-
8
-
9
-
10
-
11
-
12
-
13
-
14
-
15
-
16
-
17
-
18
-
19
-
20
-
 21
21 -
 22
22 -
 23
23 -
 24
24 -
 25
25 -
 26
26 -
 27
27 -
 28
28 -
 29
29 -
 30
30 -
 31
31 -
32
-
33
-
34
-
35
-
36
-
37
-
38
-
39
-
40
-
41
-
42
-
43
-
44
-
45
-
46
-
47
-
48
-
49
-
50
-
51
-
52
-
53
-
54
-
55
-
56
-
57
-
58
-
59
-
60
-
61
-
62
-
63
-
64
-
65
-
66
-
67
-
68
-
69
-
70
-
71
-
72
-
73
-
74
-
75
-
76
-
77
-
78
-
79
-
80
-
81
-
82
-
83
-
84
-
85
-
86
-
87
-
88
-
89
-
90
-
91
-
92
-
93
-
94
-
95
-
96
-
97
-
98
 |
 |