Asus M1A M1 Series Manual - Page 41
CD/DVD Drive
 |
View all Asus M1A manuals
Add to My Manuals
Save this manual to your list of manuals |
Page 41 highlights
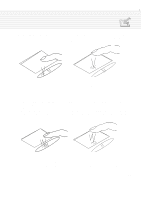
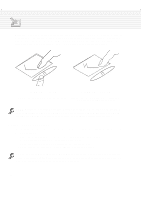
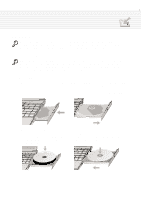
4. Using the Notebook PC CD/DVD Drive NOTE: The terms "CD-ROM" or "CD" are mainly used in all documentation because of its wide familiarity, although "CD/DVD" should be more appropriate since this Notebook PC supports CD-ROM, CD-RW, and DVD-ROM optional modules. The CD-ROM (Compact Disc Read Only Memory) drive can support all the popular formats: Audio/ Music CDs; Photo CDs; MS-DOS MSCDEX Mode 1 / Mode 2; CD-ROM/XA; CD-I; and Video CDs. NOTE: Only one CD may be used at one time in this CD drive. The CD drive eject button is electronic and requires that the Notebook PC be powered ON in order to eject the CD drive tray. When the Notebook PC is OFF, press the stop button on the front of the Notebook PC twice to eject the CD tray. Inserting a CD 1. While the Notebook PC's power is ON, press the CD drive eject button and the CD drive tray will eject out partially. 2. Hold the CD drive front panel and slide the CD drive tray completely out. Be careful not to touch the CD drive lens and other mechanisms. Make sure there are no obstructions that may get jammed under the CD drive tray. 3. Hold the CD by the edge and face the printed side up. Snap the CD onto the hub by pressing on both sides of the CD center. The hub should be higher than the CD when correctly mounted. 4. Slowly push the CD drive tray back into the Notebook PC. The drive begins reading the table of contents (TOC) on the CD. When the drive stops, the CD is ready to use. 41
-
 1
1 -
2
-
3
-
4
-
5
-
6
-
7
-
8
-
9
-
10
-
11
-
12
-
13
-
14
-
15
-
16
-
17
-
18
-
19
-
20
-
21
-
22
-
23
-
24
-
25
-
26
-
27
-
28
-
29
-
30
-
31
-
32
-
33
-
34
-
35
-
 36
36 -
 37
37 -
 38
38 -
 39
39 -
 40
40 -
 41
41 -
 42
42 -
 43
43 -
 44
44 -
 45
45 -
 46
46 -
47
-
48
-
49
-
50
-
51
-
52
-
53
-
54
-
55
-
56
-
57
-
58
-
59
-
60
-
61
-
62
-
63
-
64
-
65
-
66
-
67
-
68
-
69
-
70
-
71
-
72
-
73
-
74
-
75
-
76
-
77
-
78
-
79
-
80
-
81
-
82
-
83
-
84
-
85
-
86
-
87
-
88
-
89
-
90
-
91
-
92
-
93
-
94
-
95
-
96
-
97
-
98
 |
 |