Asus RS260-E4 RX8 Service Guide - Page 41
Then, firmly push down the card
 |
View all Asus RS260-E4 RX8 manuals
Add to My Manuals
Save this manual to your list of manuals |
Page 41 highlights
3. Unscrew the metal cover opposite the PCI-X slot that you want to use. 4. The card golden connectors should match the notches on the slot. Then, firmly push down the card until it is completely seated on the slot. 5. Secure the card bracket with a screw. 6. Connect power or signal cable(s) to the card, if applicable. Repeat steps 3 to 6 if you wish to install other PCI-X cards. 7. Before re-installing the PCI cage into the chassis, check that all cables on the PCI cage bay are properly connected and routed. Cables on the PCI cage bay ASUS RS260-E4/RX8 2-21
-
 1
1 -
2
-
3
-
4
-
5
-
6
-
7
-
8
-
9
-
10
-
11
-
12
-
13
-
14
-
15
-
16
-
17
-
18
-
19
-
20
-
21
-
22
-
23
-
24
-
25
-
26
-
27
-
28
-
29
-
30
-
31
-
32
-
33
-
34
-
35
-
 36
36 -
 37
37 -
 38
38 -
 39
39 -
 40
40 -
 41
41 -
 42
42 -
 43
43 -
 44
44 -
 45
45 -
 46
46 -
47
-
48
-
49
-
50
-
51
-
52
-
53
-
54
-
55
-
56
-
57
-
58
-
59
-
60
-
61
-
62
-
63
-
64
-
65
-
66
-
67
-
68
-
69
-
70
-
71
-
72
-
73
-
74
-
75
-
76
-
77
-
78
-
79
-
80
-
81
-
82
-
83
-
84
-
85
-
86
-
87
-
88
-
89
-
90
-
91
-
92
-
93
-
94
-
95
-
96
-
97
-
98
-
99
-
100
-
101
-
102
-
103
-
104
-
105
-
106
-
107
-
108
-
109
-
110
-
111
-
112
-
113
-
114
-
115
-
116
-
117
-
118
-
119
-
120
-
121
-
122
-
123
-
124
-
125
-
126
-
127
-
128
-
129
-
130
-
131
-
132
-
133
-
134
-
135
-
136
-
137
-
138
-
139
-
140
-
141
-
142
-
143
-
144
-
145
-
146
-
147
-
148
-
149
-
150
-
151
-
152
-
153
-
154
-
155
-
156
-
157
-
158
-
159
-
160
-
161
-
162
-
163
-
164
-
165
-
166
-
167
-
168
-
169
-
170
-
171
-
172
-
173
-
174
-
175
-
176
-
177
-
178
-
179
-
180
-
181
-
182
 |
 |

ASUS RS260-E4/RX8
2-21
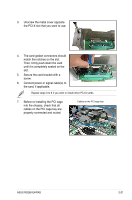
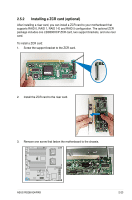
3.
Unscrew the metal cover opposite
the PCI-X slot that you want to use.
4.
The card golden connectors should
match the notches on the slot.
Then, firmly push down the card
until it is completely seated on the
slot.
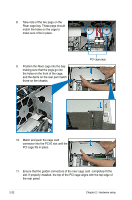
5.
Secure the card bracket with a
screw.
6.
Connect power or signal cable(s) to
the card, if applicable.
Repeat steps 3 to 6 if you wish to install other PCI-X cards.
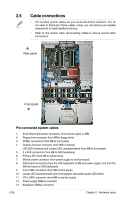
7.
Before re-installing the PCI cage
into the chassis, check that all
cables on the PCI cage bay are
properly connected and routed.
Cables on the PCI cage bay