Asus RS260-E4 RX8 Service Guide - Page 50
Removable components
 |
View all Asus RS260-E4 RX8 manuals
Add to My Manuals
Save this manual to your list of manuals |
Page 50 highlights
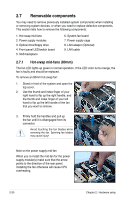
2.7 Removable components You may need to remove previously installed system components when installing or removing system devices, or when you need to replace defective components. This section tells how to remove the following components: 1. Hot-swap mid-fans 2. Power supply modules 3. Optical drive/floppy drive 4. Front panel LED/switch board 5. SAS backplane 6. System fan board 7. Power supply cage 8. LAN adaper (Optional) 9. LAN cable 2.7.1 Hot-swap mid-fans (80mm) The fan LED lights up green in normal operation. If the LED color turns orange, the fan is faulty and should be replaced. To remove an 80mm hot-swap fan: 1. Stand in front of the system and open the top cover. 2. Use the thumb and index finger of your right hand to flip up the right handle, and the thumb and index finger of your left hand to flip up the left handle of the fan that you want to remove. 3. Firmly hold the handles and pull up the fan until it is disengaged from its connector. Avoid touching the fan blades while removing the fan. Spinning fan blades may cause injury! Note on the power supply mid-fan When you re-install the mid-fan for the power supply module(s) make sure that the arrow points to the direction of the rear panel. Installing the fan otherwise will cause CPU overheating. 2-30 Chapter 2: Hardware setup
-
 1
1 -
2
-
3
-
4
-
5
-
6
-
7
-
8
-
9
-
10
-
11
-
12
-
13
-
14
-
15
-
16
-
17
-
18
-
19
-
20
-
21
-
22
-
23
-
24
-
25
-
26
-
27
-
28
-
29
-
30
-
31
-
32
-
33
-
34
-
35
-
36
-
37
-
38
-
39
-
40
-
41
-
42
-
43
-
44
-
 45
45 -
 46
46 -
 47
47 -
 48
48 -
 49
49 -
 50
50 -
 51
51 -
 52
52 -
 53
53 -
 54
54 -
 55
55 -
56
-
57
-
58
-
59
-
60
-
61
-
62
-
63
-
64
-
65
-
66
-
67
-
68
-
69
-
70
-
71
-
72
-
73
-
74
-
75
-
76
-
77
-
78
-
79
-
80
-
81
-
82
-
83
-
84
-
85
-
86
-
87
-
88
-
89
-
90
-
91
-
92
-
93
-
94
-
95
-
96
-
97
-
98
-
99
-
100
-
101
-
102
-
103
-
104
-
105
-
106
-
107
-
108
-
109
-
110
-
111
-
112
-
113
-
114
-
115
-
116
-
117
-
118
-
119
-
120
-
121
-
122
-
123
-
124
-
125
-
126
-
127
-
128
-
129
-
130
-
131
-
132
-
133
-
134
-
135
-
136
-
137
-
138
-
139
-
140
-
141
-
142
-
143
-
144
-
145
-
146
-
147
-
148
-
149
-
150
-
151
-
152
-
153
-
154
-
155
-
156
-
157
-
158
-
159
-
160
-
161
-
162
-
163
-
164
-
165
-
166
-
167
-
168
-
169
-
170
-
171
-
172
-
173
-
174
-
175
-
176
-
177
-
178
-
179
-
180
-
181
-
182
 |
 |
