Asus T2-PE1 T2-PE1 English User Manual E2151 - Page 13
Front panel I/O door.
 |
View all Asus T2-PE1 manuals
Add to My Manuals
Save this manual to your list of manuals |
Page 13 highlights
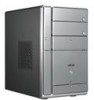
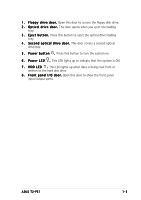
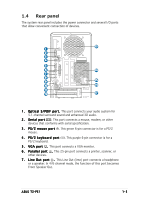
1 . F l o p p y d r i v e d o o r . Open this door to access the floppy disk drive. 2 . O p t i c a l d r i v e d o o r . This door opens when you eject the loading tray. 3 . E j e c t b u t t o n . Press this button to eject the optical drive loading tray. 4 . S e c o n d o p t i c a l d r i v e d o o r . This door covers a second optical drive bay. 5 . P o w e r b u t t o n . Press this button to turn the system on. 6 . P o w e r L E D . This LED lights up to indicate that the system is ON. 7 . H D D L E D . This LED lights up when data is being read from or written to the hard disk drive 8 . F r o n t p a n e l I / O d o o r . Open this door to show the front panel input/output ports. ASUS T2-PE1 1-3
-
 1
1 -
2
-
3
-
4
-
5
-
6
-
7
-
 8
8 -
 9
9 -
 10
10 -
 11
11 -
 12
12 -
 13
13 -
 14
14 -
 15
15 -
 16
16 -
 17
17 -
 18
18 -
19
-
20
-
21
-
22
-
23
-
24
-
25
-
26
-
27
-
28
-
29
-
30
-
31
-
32
-
33
-
34
-
35
-
36
-
37
-
38
-
39
-
40
-
41
-
42
-
43
-
44
-
45
-
46
-
47
-
48
-
49
-
50
-
51
-
52
-
53
-
54
-
55
-
56
-
57
-
58
-
59
-
60
-
61
-
62
-
63
-
64
-
65
-
66
-
67
-
68
-
69
-
70
-
71
-
72
-
73
-
74
-
75
-
76
-
77
-
78
-
79
-
80
-
81
-
82
-
83
-
84
-
85
-
86
-
87
-
88
-
89
-
90
-
91
-
92
-
93
-
94
-
95
-
96
-
97
-
98
-
99
-
100
-
101
-
102
-
103
-
104
-
105
-
106
-
107
-
108
-
109
-
110
 |
 |

1-3
1-3
1-3
1-3
1-3
ASUS T2-PE1
ASUS T2-PE1
ASUS T2-PE1
ASUS T2-PE1
ASUS T2-PE1
1.
1.
1.
1.
1.
Floppy drive door.
Floppy drive door.
Floppy drive door.
Floppy drive door.
Floppy drive door. Open this door to access the floppy disk drive.
2.
2.
2.
2.
2.
Optical drive door.
Optical drive door.
Optical drive door.
Optical drive door.
Optical drive door. This door opens when you eject the loading
tray.
3.
3.
3.
3.
3.
Eject button.
Eject button.
Eject button.
Eject button.
Eject button. Press this button to eject the optical drive loading
tray.
4.
4.
4.
4.
4.
Second optical drive door.
Second optical drive door.
Second optical drive door.
Second optical drive door.
Second optical drive door. This door covers a second optical
drive bay.
5.
5.
5.
5.
5.
Power button
Power button
Power button
Power button
Power button
.
.
.
.
. Press this button to turn the system on.
6.
6.
6.
6.
6.
Power LED
Power LED
Power LED
Power LED
Power LED
.
.
.
.
. This LED lights up to indicate that the system is ON.
7.
7.
7.
7.
7.
HDD LED
HDD LED
HDD LED
HDD LED
HDD LED
.
.
.
.
. This LED lights up when data is being read from or
written to the hard disk drive
8.
8.
8.
8.
8.
Front panel I/O door.
Front panel I/O door.
Front panel I/O door.
Front panel I/O door.
Front panel I/O door. Open this door to show the front panel
input/output ports.