Asus TRL-DLS TRL-DLS User Manual - Page 69
Driver Installation
 |
View all Asus TRL-DLS manuals
Add to My Manuals
Save this manual to your list of manuals |
Page 69 highlights
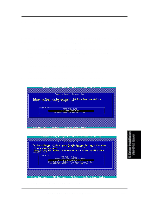
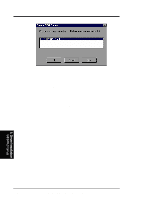
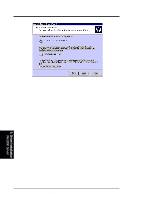
5. OS Driver Installation B2. Boot Floppy Disk Installation 1. Start the Windows NT installation by booting from the Microsoft Setup floppy disk. 2. Press Enter when the Welcome to Setup screen appears. The Windows NT Workstation Setup window appears next. 3. Press S to skip automatic detection and perform a manual selection. A screen displays the message "Setup has recognized the following mass storage devices in your computer...". 4. With floppy disk 2, there is an initial setup screen that prompts you to continue by pressing Enter. 5. Press S to skip mass storage device detection. To change the driver, see Existing System Installation. 6. When a screen displays the SCSI adapters found, choose S to configure additional SCSI adapters. 7. Move the highlight bar to Other and press Enter. 8. When prompted for the manufacturer-supplied hardware support disk, insert the appropriate Adaptec driver diskette containing the Windows NT driver required to support your Adaptec adapter(s) and press Enter. The driver files are distributed with ASUS Driver Support CD and are created from the previous section for "Preparing an Adaptec Driver Diskette". 9. Depending on the driver being installed, Adaptec 19160, 29160(N), 39160, AHA-3960D, AIC-7892/7899 Ultra160 PCI SCSI Controller (NT4.0) is shown highlighted. Press Enter to proceed. 10. The Windows NT Setup window reappears. If using an IDE CD-ROM Drive for installation, press S to load additional drives. Another window appears. Scroll up and select: IDE CD-ROM (ATAPI 1.2/PCI IDE Controller. Press Enter. (-or-) If you have completed configuring additional SCSI adapters, press Enter. 11. Windows NT should now recognize the miniport driver and the SCSI hardware. Press Enter to continue. At this point, simply follow the Microsoft Windows NT installation procedure. As for the onboard LAN and VGA, please refer to the later sections for network and graphics driver installation. 5. Driver Installation WinNT4.0 Server ASUS TRL-DLS User's Manual 69
-
 1
1 -
2
-
3
-
4
-
5
-
6
-
7
-
8
-
9
-
10
-
11
-
12
-
13
-
14
-
15
-
16
-
17
-
18
-
19
-
20
-
21
-
22
-
23
-
24
-
25
-
26
-
27
-
28
-
29
-
30
-
31
-
32
-
33
-
34
-
35
-
36
-
37
-
38
-
39
-
40
-
41
-
42
-
43
-
44
-
45
-
46
-
47
-
48
-
49
-
50
-
51
-
52
-
53
-
54
-
55
-
56
-
57
-
58
-
59
-
60
-
61
-
62
-
63
-
 64
64 -
 65
65 -
 66
66 -
 67
67 -
 68
68 -
 69
69 -
 70
70 -
 71
71 -
 72
72 -
 73
73 -
 74
74 -
75
-
76
-
77
-
78
-
79
-
80
-
81
-
82
-
83
-
84
-
85
-
86
 |
 |
