Behringer MODEL D Quick Start Guide - Page 16
MODEL D Getting started - patches
 |
View all Behringer MODEL D manuals
Add to My Manuals
Save this manual to your list of manuals |
Page 16 highlights
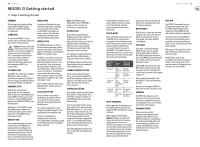
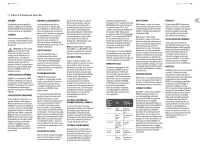
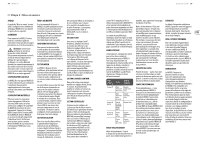
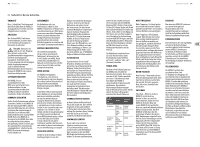
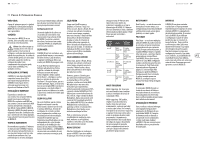
30 MODEL D MODEL D Getting started (EN) Step 3: Getting started OVERVIEW This 'getting started' guide will help you set up the MODEL D analog synthesizer and briefly introduce its capabilities. CONNECTION To connect the MODEL D to your system, please consult the connection guide earlier in this document. Caution: Do not overload the 3.5 mm inputs. They can only accept the correct level of voltages as shown in the specification tables. The 3.5 mm outputs should only be connected to inputs capable of receiving the output voltages. Failure to follow these instructions may damage the MODEL D or external units. SOFTWARE SETUP The MODEL D is a USB Class Compliant MIDI device, and so no driver installation is required. The MODEL D does not require any additional drivers to work with Windows and MacOS. HARDWARE SETUP Make all the connections in your system. Use the rear panel MIDI switches to set the MODEL D to a unique MIDI channel in your system. Connect an external MIDI keyboard directly to the MODEL D MIDI IN 5-pin DIN type input. Apply power to the MODEL D using the supplied power adapter only. Ensure your sound system is turned down. Turn on the MODEL D rear panel power switch. WARM UP TIME We recommend leaving 15 minutes or more time for the MODEL D to warm up before recording or live performance. (Longer if it has been brought in from the cold.) This will allow the precision analog circuits time to reach their normal operating temperature and tuned performance. INITIAL SETUP A quick way of finding out if your external sound system is working, is to turn on the A-440 switch on the MODEL D and adjust the volume control. This will send a constant tone (440 Hz) to your external amplifier and speakers. MIXER SECTION The MODEL D has three oscillators, an internal Noise generator, and an external source input. Each of these, and any combination, are used by the MODEL D to generate sound. The Mixer section allows you to turn each of these sources on or off, and adjust the volume of each to create an overall mix. Start by turning on the top switch for Oscillator 1, and turn off the others. Adjust the volume control of Oscillator 1. In the Output section, adjust the main volume. Now, if you play a note on your MIDI keyboard, you should hear the sound of Oscillator 1 only. Turn on other oscillators and/or noise and adjust their volume controls to create a mix. OSCILLATOR SECTION In the Oscillator section, adjust the Range knob and you will hear the sound of the various octaves. Adjust the wavetype and listen to the differences. The oscillator modulation switch allows the oscillator frequency to be modulated by the modulation mix. The OSC 3 switch allows its frequency to be affected by, or be independent of, the notes played on the keyboard, and the modulation and pitch wheels. Note: The TUNE knob and OSCILLATOR-2 and -3 FREQUENCY knobs are marked in units of semi tones as a general guide. FILTER SECTION Play with the Cutoff Frequency, Emphasis, and Contour, and listen to their effects on the sound. Adjust the Attack, Decay, and Sustain; they affect the cutoff frequency with time, while a note is played. The filter decay switch affects the decay after a note is released. The 2 keyboard switches affect how much the filter is affected by the frequency of notes that are played. If the filter modulation switch is ON then the filter section is modulated by the modulation mix. LOUDNESS CONTOUR SECTION In this section, adjust the Attack, Decay, and Sustain; they affect the overall level with time, while a note is played. The loudness decay switch affects the decay in level after a note is released. CONTROLLERS SECTION First set the 2 switches to choose from internal LFO or internal Noise, OSC 3 or the filter envelope, and then use the MOD MIX knob to vary the mix between them. You can experiment by first setting the switch to OSC 3, and turning the MOD MIX knob to OSC 3. Then set the Oscillator 3 range control to LO, and the Oscillator Modulation switch ON. You may now be able to hear the sound of the Oscillator 1 modulated by OSC 3. Use the MOD DEPTH knob, and/or the Modulation wheel of your keyboard to increase the effect. If the Filter Modulation switch is ON, listen to the effect of modulation on the filter. Quick Start Guide 31 The Modulation Sensitivity curve can be chosen from hard, medium, or soft (the default), using the SysEx commands shown later in this manual. SPECIAL MODES The A-440 switch can be used to set the MODEL D into various modes of operation. This is done by turning the A-440 switch on and off a certain number of times within the first 5 seconds of turning on power to the MODEL D. The number of times determines the mode, as shown in the table below. The Power LED will show the current value by flashing. Press the A-440 switch: On and off On and off and on On and off, On and off Mode Power LED FLashing Multi- Flashing trigger ON fast twice Multitrigger OFF Flashing slow twice Note Flashing Priority 3 times LAST/LOW/ HIGH Poly Chain Flashing fast ON four times Poly Chain Flashing slow OFF four times MULTI-TRIGGERING Multi-triggering - On: playing a new note will change the pitch and also trigger the filter and loudness contour envelopes. Multi-triggering - Off (default, Legato): playing a new note will change the pitch, but with no new triggering unless all notes are released. For example, you can play a note and hold it down, and any new note will play and use the envelopes of the note being held. The second note will often play after the attack and decay time of the held note has passed, so the second note will not have the sound that the attack and decay usually give. NOTE PRIORITY Note Priority - if more than one note is played at the same time, this sets which note has priority: the last note played, the lowest (default), or the highest. POLY CHAIN Poly Chain - if you have multiple MODEL D units, you can connect them in a Poly Chain so that the first MODEL D plays the lowest note, the second MODEL D plays the second lowest note, and so on, to produce polyphonic sound. Each MODEL D must have the same MIDI channel number set using the rear panel switches. The Poly Chain connections are shown in the diagram on page 13. Only set the Poly Chain ON for the first MODEL D. Turn it OFF when you are done. If you are only using one MODEL D, then make sure the Poly Chain is OFF. EURORACK The MODEL D synthesizer can be taken out of its factory chassis and fitted into a standard Eurorack case (not supplied). Please see the details shown later in this manual. FIRMWARE UPDATE Please check our website behringer.com regularly for any updates to the firmware of your MODEL D synthesizer. The firmware file can be downloaded and stored on your computer, and then used to update the MODEL D. It comes with detailed instructions on the update procedure. HAVE FUN The MODEL D has various Gate and CV inputs and outputs that allow for further experimentation and expansion to other MODEL D units and modular synthesizer equipment. The SysEx features of the MODEL D allow you to set and adjust various parameters to suit your preferences. Please see the SysEx information later in this manual. Make copies of the patch sheet at the end of this manual, and record your favorite settings. With all these controls, the possibilities for musical creativity are endless, rather like an artist with a new box of paints. We hope that you will enjoy your new MODEL D.
-
 1
1 -
2
-
3
-
4
-
5
-
6
-
7
-
8
-
9
-
10
-
 11
11 -
 12
12 -
 13
13 -
 14
14 -
 15
15 -
 16
16 -
 17
17 -
 18
18 -
 19
19 -
 20
20 -
 21
21 -
22
-
23
-
24
-
25
-
26
-
27
-
28
 |
 |