Behringer WING Quick Start Guide 1 - Page 5
WING Overview - firmware
 |
View all Behringer WING manuals
Add to My Manuals
Save this manual to your list of manuals |
Page 5 highlights
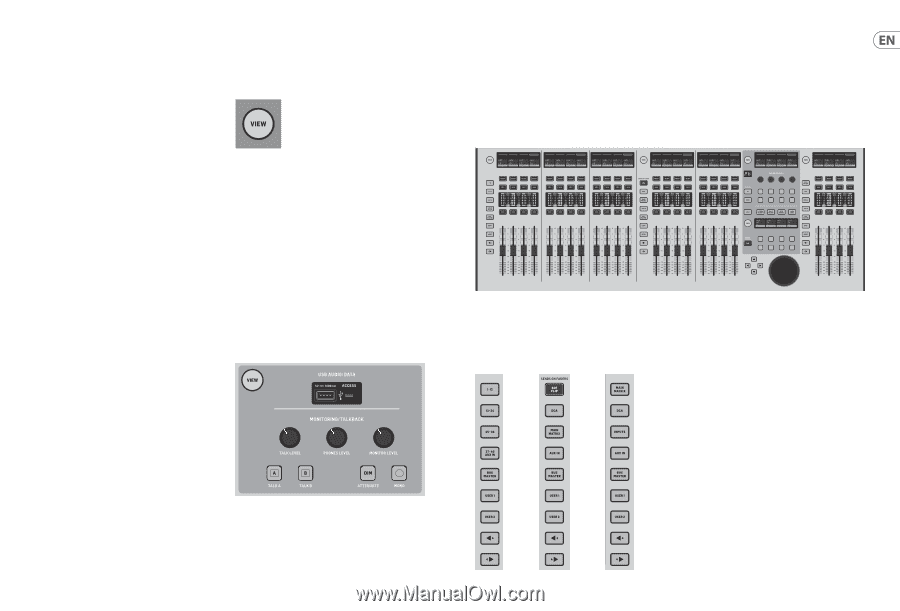
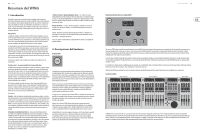
8 WING WING Overview 1. Introduction 2. Hardware Descriptions Congratulations on purchasing this ground-breaking and innovative console and welcome to the WING Quick Start Guide. We have built upon the wildly-successful X32 platform to bring a product to the audio world that expands the capabilities and ease-of-use in every way. Continue through this guide to get a broad overview of the WING's functionality, and don't forget to visit behringer.com for tutorial videos and guides. VIEW buttons Before you start The first shipments of the WING console are equipped with an early version of the firmware that will surely be outdated by the time it reaches customers. If you're reading this, you are one of the privileged few to get your hands on this console first and experience all the new benefits. It is wise to periodically check for new firmware updates, as new features and bug fixes will be released regularly. Our development team is eager to react to customer suggestions as much as it is to surprise you with improvements and new features. Visit the product page on behringer.com to download the latest firmware so you can enjoy the full potential of your WING. Please refer to Chapter 6 in this QSG for details about the update process. Source and Channel - a new routing approach WING takes the idea of labeling channels with names, icons and colors one step further to the actual Source. Combining and balancing the ratio between audio sources is the fundamental reason for mixing. It is not about the channel, where audio processing is applied, it is the Source that matters in the first place. Hence, WING Sources comprise a specific input, its preamp parameters like gain, mute and phantom power, the mode mono/stereo/mid-side, a name, icon and color, as well as user-definable tags. These Sources can be used by one or several channels for applying processing and sending the audio to buses or mains. They can also be patched to any output directly when no processing is desired, such as recording setups or when sharing audio with another console for independent mixes. To summarize: Sources - This is technically any entry point of audio into the console. An input could be an analog XLR or ¼"connection to the rear panel, signals from a stage box, USB connection, expansion card, etc. These are the anchor points for any audio processing and routing in WING. The Source carries identifying characteristics like name, color, icon, and tags, and it also owns the gain, mute, phantom power and mono/stereo/mid-side mode of that input. 48 Mono/Stereo Input Channels - Every Input Channel can be connected to a Main and an Alternative Source. Channels in WING allow to apply extremely powerful and flexible processing to the Source audio. They can inherit the Source's customization properties like name, icon, color and tags. They will automatically use the input audio in mono or stereo depending on the Source's mode, and there is no need for linking channels to a stereo pair any longer. Channel audio can then be sent to buses or mains for mixing, or it can be tapped individually for connecting outputs directly. 16 Stereo Buses and 4 Stereo Mains - The 16 Buses will typically be used for send-style FX processing or monitor mixing, and will often be sent to one of the 4 Mains. Both Buses and Mains can be sent to Matrix, User Signals or Output destinations. 8 Matrix Buses - Matrix buses can be sent to User Signals or Output destinations, and are often used for sub or zone mixes. Outputs - There are a huge number of analog and digital destinations, where processed, mixed or raw Source audio can be sent to-without any restrictions. See Chapter 4: Patching and Setup for more details and an example scenario. Each major section of the console's top panel has a button called VIEW. Pressing one of these will switch the Main Display to a dedicated screen for the section whose VIEW button was pressed. The Main Display will often have additional parameters, options or information that is not accessible from the top panel alone. While active, a VIEW button will light green. Pressing the same VIEW button will return the Main Display to the screen that was previously active, and the VIEW button will lose illumination. Manually navigating away from the screen that was selected with a VIEW button will also cause it to dim. In some cases, pressing a VIEW button is just a shortcut to a screen that could otherwise be reached via Main Screen navigation, and in other cases it is the only way to access a screen. Some VIEW buttons support a press-and-hold function that accesses an additional configuration page. For example, pressing and holding any of the fader bank VIEW buttons accesses the edit screen where channels and buses can be rearranged. The VIEW button for the Channel Strip section to the right of the Main Display will act in conjunction with the 6 block buttons within that section (Input, Filter, Gate, etc). These merely act as shortcuts to pages within the Home screen, so very few common functions are more than a button press away. Monitoring/Talkback/USB A USB type-A connector allows a flash drive to be plugged directly into the console for saving or loading data. This allows you to always have a backup of your show files, or even use a rented WING console while retaining your usual setup. The connector also allows recording and playback of audio files. The port can charge a portable device such as a phone or tablet, which is especially convenient if you frequently rely on a device like this to mix wirelessly. Quick Start Guide 9 The section also has dedicated level knobs for the headphone outputs (located on the underside of the top edge) and the monitor outputs (which default to Aux output 7/8 on the rear panel). Engaging the DIM button reduces the monitor volume, and the MONO button sums the monitor signal to mono. The talkback mic level can be adjusted via TALK LEVEL knob, and TALK A and B buttons send the talkback signal to different destinations. Either Channel 40 or Aux 8 can be used as input for the talkback channel. Press the VIEW button to control the monitor settings, adjust the amount of Dim attenuation, select routing for the talkback mic, and other parameters. Fader Sections Input channels Bus/DCA/Matrix Main/Matrix The WING has 3 fader sections that each have their own associated bank buttons. The group of 12 faders to the left side of the console are labeled mostly for input channels, the group of 8 faders in the center typically control buses and DCAs, and the small group of 4 faders to the right are meant for main or matrix outputs. However, there are no restrictions with how the fader banks can be configured. To access the fader bank configuration, press and hold the VIEW button for one of the fader sections. Layer/Bank buttons Selecting different fader banks will instantly bring a new set of channels to the associated fader section, including the scribble strip names/icons, and the motorized faders will jump to their correct positioning. If a particular bank does not fit on the available physical faders in a section (for example, Bus Masters), the shift arrows will scroll in blocks of 4 to access the remaining channels. Each fader section also has 2 user-defined banks that can contain a variety of channels. For monitor mixing, a very convenient feature called Sends on Faders is available to quickly adjust the channel send levels to a particular bus. • Press the SOF FLIP button to activate Sends on Faders. The MUTE buttons on all sends (input channel fader strips) are active by default to protect buses in subgroup mode. • Make sure the BUS MASTERS button is lit in the bus fader section, then press one of the SELECT buttons to identify the bus to which channel signals will be sent. • Raise the input channel faders for each of the channels that should be sent to that bus, navigating through the different input banks if necessary. Remember to disengage the SOF FLIP button when you want to return to normal mixing.
-
 1
1 -
 2
2 -
 3
3 -
 4
4 -
 5
5 -
 6
6 -
 7
7 -
 8
8 -
 9
9 -
 10
10 -
 11
11 -
12
-
13
-
14
-
15
-
16
-
17
-
18
-
19
-
20
-
21
-
22
-
23
-
24
-
25
-
26
-
27
-
28
-
29
-
30
-
31
-
32
-
33
-
34
-
35
 |
 |