Behringer WING Quick Start Guide 1 - Page 7
Main Screens - dante
 |
View all Behringer WING manuals
Add to My Manuals
Save this manual to your list of manuals |
Page 7 highlights
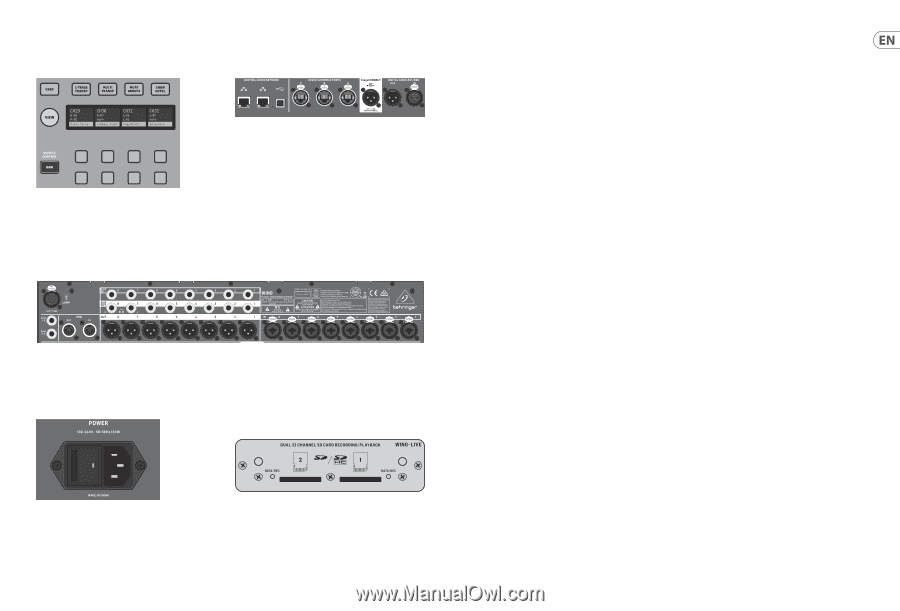
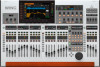
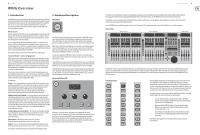
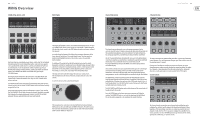
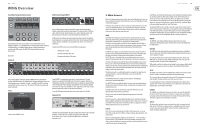
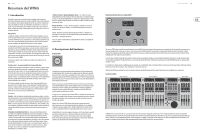
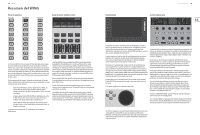
12 WING WING Overview Show/Mute/Transport/Automix Control AES50/Control/StageCONNECT The bottom portion of the Custom Control section allows quick access to different categories. Press the VIEW button to configure each of them. It offers a combination of user-assignable buttons and pre-configured buttons for controlling the USB recorder, the WING LIVE recorder, Mute Groups and Show Control. Rear Panel Analog I/O A pair of Ethernet ports allow a network to be set up via router for wired or wireless control using one of the control apps for PC, phone or tablet. A USB port allows bidirectional 48-channel transmission as well as firmware updates and data exchange. An ASIO driver can be downloaded from behringer.com. 3 AES50 ports can each provide up to 48 input and output channels to and from digital stageboxes, ensuring abundant channel count and allowing patching from multiple locations. The WING is fully compatible with all X32 series mixers and stage boxes. Cabling for all AES50 connections between WING and stage boxes: • Shielded CAT-5e cable • Ethercon terminated cable ends • Maximum cable length of 80 meters The rear panel analog connections include 8 MIDAS PRO series microphone preamps and 8 XLR outputs, plus 8 balanced ¼" aux input and output connectors. A lamp socket accepts a standard 12 V light. 5-pin MIDI IN and OUT jacks allow external MIDI control, and a pair of ¼"TRS jacks for GPIO allow basic input and output commands. Power StageCONNECT is a proprietary connection for transmitting up to 32 audio channels via standard XLR and DMX cable. The interface supports different bus configurations of input and output channels and uses digital, uncompressed PCM at 44.1/48 kHz and 24-bit resolution. StageCONNECT was developed for flexible connections on stage using standard mic cable, supporting a wide range of stage boxes and monitoring systems at sub-millisecond latency. Stereo AES/EBU input and output connections can be made via XLR cables. Expansion Slot Connect the included IEC cable. The WING ships with the WING-LIVE card installed, which allows up to 64 channels of 48 kHz / 32-bit audio to be recorded onto a pair of SD or SDHC cards. Other options such as Dante, SoundGrid and MADI will be available for purchase as well. Quick Start Guide 13 3. Main Screens Most of the advanced editing and control is done on the Main Display. Screens can be accessed via the 7 buttons to the left of the screen, or via VIEW buttons in each section of the top panel. The layout varies greatly from screen to screen, but a fairly permanent status bar can be seen along the top of the screen to provide quick reference for channel name, clock, and alerts. This also allows constant access to the SD card controls, setup menu, library functions and other tools. HOME The HOME screen defaults to an overview of the selected channel. This screen allows adjustment of basic parameters like pan and level, but mostly provides a launch point to important processing blocks like EQ and dynamics. The blocks can be navigated using the left column regardless of which block is currently in view. Note that the processing sequence of gate, dynamics, EQ, and insert can be adjusted by pressing the Edit button at the bottom of the left column. The INPUT screen appears second in the left-hand column, though the order of the blocks can be customized on the default/overview screen. The primary and alternate Source that is assigned to the current channel is selected here. The FILTER screen is also a part of this section, allowing low cut, hi cut and advanced filtering options like tilt filter and all-pass filter for phase alignment. The GATE screen appears 3rd in the left-hand column, though the order of some blocks can be customized on the HOME overview screen. The block defaults to a simple noise gate with common parameters like threshold and ratio, though many other effects can be selected from the Gate Model menu. This block's name will change to reflect the chosen model. The EQ block defaults to a 6-band fully-parametric equalizer for input channels, and 8-band for buses. A variety of EQ models can be selected from the EQ Model menu. The DYNAMICS block offers a large selection of generic and legendary compressors, expanders and limiters. Two INSERT blocks are available by default, one that can be positioned before or after the Gate, EQ and/or Dynamics blocks, and another that is fixed post-fader and input processing. The MAIN screen allows the send level to each of the 4 Master buses to be adjusted along with the width, pan and level. The last screen in the left-hand column allows adjustment of send levels to all 16 buses. The Home screen has a similar appearance when a bus is selected, but no gate block is available and only trim can be adjusted. The bus mode can be set to pre or post-fader if they will be used for monitoring or effects, or subgroup if channels will be routed to the bus prior to the main mix. EFFECTS The EFFECTS screen controls all aspects of the 16 effects processors. Users can select from a large collection of effects, configure routing, adjust parameters and monitor levels. Effects are usually applied to channels in one of two ways - Send-style effects, and Insert effects. Time-based effects like reverb and delay work well as Send effects, whereas modulation or compression effects tend to work better as Inserts so that they can process the entire signal. Send effects are achieved by sending at least one, though often multiple channels to a bus that contains an effect such as reverb. Use one of the Insert points on the bus to select one of the many reverb effects. The channels are sent to the main output bus along with the bus that carries the effect signal. By varying the amount of signal sent to the effect bus, a proper blend of"dry"signal will appear in the main output along with the"wet"effect signal. The channel HOME screen is already set up with a couple of Insert points, one of which can be patched at several points in the signal flow. Tap one of the INS blocks in the left-hand column to assign an effect processor. A chorus or flanger effect will probably sound better as an insert rather than a send, and whether the effect goes before or after the EQ and dynamics blocks is a matter of preference. METERS The METERS screen displays different groups of level meters for various signal paths, allowing quick analysis of any channels or buses that might need level adjustment. ROUTING The ROUTING screen allows patching and configuration of sources and outputs. Two icons at the top of the Main Display determine whether the page focuses on sources (inputs) or outputs. Press the pull-down menu to select onboard analog connectors, AES50, USB, WING LIVE, etc. For Source groups, details such as name, color, icon, tags, and mono/stereo/mid-side mode can be configured here. With outputs selected, the routing can be viewed for each analog or digital output destination. To assign new sources for outputs, first disable the lock function. SETUP The SETUP screen allows network configuration for remote control of the console with a PC, tablet or smartphone running one of the dedicated apps. The screen also allows various global settings and I/O configuration for expansion cards and GPIO. The date and time can also be set on this screen. The current firmware version is listed in the bottom right corner, which can be updated either via the rear panel USB port, or via a flash drive connected to the top panel port. See the Chapter 6 for details. LIBRARY The LIBRARY screen allows the current console state to be saved into Snapshots for later recall. The scope of parameters that are recalled can be specified prior to loading. Global Safes further protect certain areas of the console from being affected by snapshot recall. See Chapter 5 for details. UTILITY This button does not have its own screen, but rather works in conjunction with other screens. The function is context relative, so depending on which screen is currently active, pressing the UTILITY button may bring up additional preset options or settings configuration.
-
 1
1 -
 2
2 -
 3
3 -
 4
4 -
 5
5 -
 6
6 -
 7
7 -
 8
8 -
 9
9 -
 10
10 -
 11
11 -
 12
12 -
13
-
14
-
15
-
16
-
17
-
18
-
19
-
20
-
21
-
22
-
23
-
24
-
25
-
26
-
27
-
28
-
29
-
30
-
31
-
32
-
33
-
34
-
35
 |
 |