Beko BDVG693 User Manual
Beko BDVG693 Manual
 |
View all Beko BDVG693 manuals
Add to My Manuals
Save this manual to your list of manuals |
Beko BDVG693 manual content summary:
- Beko BDVG693 | User Manual - Page 1
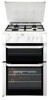
Double Gas Oven User Manual BDVG 693 P - Beko BDVG693 | User Manual - Page 2
- Beko BDVG693 | User Manual - Page 3
help you use the product in a fast and safe way. • Read the User Manual before installing and starting the product. • You must strictly observe the safety instructions. • Keep this User Manual within easy reach for future reference. • Also read other documents supplied with the product. Remember - Beko BDVG693 | User Manual - Page 4
5 Accessories supplied with the unit 5 Injector table 7 M Safety instructions 8 Basic safety instructions 8 Safety when working with electricity .9 Safety when working with gas door inner glass 32 Replacing the oven lamp 33 8 Troubleshooting 34 9 Guarantee and Service 36 3 I EN - Beko BDVG693 | User Manual - Page 5
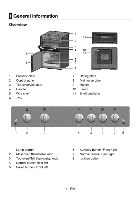
General information Overview 9 8 1 Burners' plate 2 Control panel 3 Top oven/Grill door 4 Handle 5 Wire shelf 6 Tray 3 4 10 11 5 6 7 7 Rating plate 8 Main oven door 9 Handle 10 Lamp 11 Shelf positions 2 3 4 5 6 7 8 1 Lamp button 2 Main oven thermostat knob 3 Top oven/Grill thermostat knob 4 - Beko BDVG693 | User Manual - Page 6
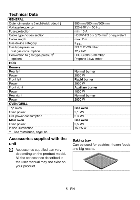
See Installation, page 12. Accessories supplied with the unit [1:1 Accessories supplied can vary depending on the product model. All the accessories described in the user manual may not exist on your product. 900 mm/600 mm/600 mm 220-240 V - 50 Hz min. 13 A H05VV-FG 3 x 0,75 mm2 or equivalent max - Beko BDVG693 | User Manual - Page 7
Deep roasting tray Can be used for pastries, big roasts, foods with liquid content and during grilling as dripping pan. Metal shield should be attached on the rear upper side of wire shelf. Use the wire shelf as its bended side positioned on the front of the cavity and turned downside. Pastry tray - Beko BDVG693 | User Manual - Page 8
1000 W Front right 2000 W Rear right 115 87 Gas oven 105 71 Gas oven 115 78 72 103 50 72 Grill 110 75 call CUSTOMER SERVICES HELPLINE. 0845 600 4911 to order LPG injector kit. 7 I EN - Beko BDVG693 | User Manual - Page 9
instructions Basic safety instructions • The manufacturer reserves its right to make changes in the technical specifications in order to improve the appliance quality without any prior notice. Figures included in this manual may remedy some malfunctions; see Troubleshooting, page 34. • Be careful - Beko BDVG693 | User Manual - Page 10
• Always use heat-resistant gloves • when putting or removing the dishes into/from your oven. • Don't use the cooker with front door glass removed. • Rear surface of the oven gets hot • when it is in use. Gas / Electric connection should not touch the rear surface, otherwise the mains - Beko BDVG693 | User Manual - Page 11
the fire-brigade. Use a telephone outside the house. Call the Gas Emergency Services immediately on 0800 111 999 the grill is in use. Young children should be are secured by an electric lock, or entry phone, please open these manually. 6. Do not re-enter the property until you are told it is - Beko BDVG693 | User Manual - Page 12
and sort in accordance with recycled waste instructions. Do not dispose of them with normal domestic of your equipment by identifying possible damage during the transportation. Secure the caps and pan supports with adhesive tape. To prevent the wire shelf and tray inside the oven from damaging the - Beko BDVG693 | User Manual - Page 13
distance of 650 mm above the hob surface. • * If a cooker hood is to be installed above the cooker, refer to cooker hood manufacturer' instructions regarding installation height (min 650 mm) • Movement of your appliance is most easily achieved by lifting the front as follows and pulling towards - Beko BDVG693 | User Manual - Page 14
Room size Ventilation 4 opening smaller than 5 m3 min. 100 cm2 5 m3 to 10 m3 min. 50 cm2 greater than 10 m3 not required In the cellar or min. 65 cm2 2 3 basement 5 1 Hook (is not supplied) 2 Safety chain (supplied and mounted to oven) 3 Rear of cooker 4 Firmly fix chain to cooker rear - Beko BDVG693 | User Manual - Page 15
hot region behind the oven. CD If you need to use your appliance later with a different type of gas, you must consult an authorised service centre for the related conversion procedure. Connecting the gas hose Seal all connections with gas sealant. 1. Shut gas supply. 2. Connect cooker hose (5) to - Beko BDVG693 | User Manual - Page 16
1 2 3 4 7 6 5 1 Shut-off valve 2 Adapter (optional) 1/2" outlet 3 Extension pipe 4 Valve with right angled elbow 5 Cooker hose with bayonet fitting 6 Connection piece 7 Gas feeding tube itt Risk of explosion by damage of the cooker hose! The cooker hose must not be clamped, bent or trapped or come - Beko BDVG693 | User Manual - Page 17
and make flame adjustment for all valves at reduced flow rate position. • Gas conversion must only be carried out by a Gas Safe registered installer or service agent. Exchange injector for the burners 1. Take off burner cap and burner body. 2. Unscrew injectors. 3. Fit new injectors. 161 EN - Beko BDVG693 | User Manual - Page 18
2 Sparking plug 3 Injector 4 Burner Unless there is an abnormal condition, do not attempt to remove the gas burner taps. You must call an Authorised service agent if it is necessary to change the taps. Reduced gas flow rate setting for hob taps clockwise. If it is smaller turn anticlockwise. 5. For - Beko BDVG693 | User Manual - Page 19
Exchange of injector for grill burner 1 2 1. Back wall 2. Shut-off valve 3 4 ■ 2- After removing the rear cover sheet (1), you can reach the grill burner tube (3) and grill injector holder (4). 3- Unscrew the grill injector holder(4) fixing screw(6). 4- Unscrew the injector (5) and replace it - Beko BDVG693 | User Manual - Page 20
the flame, turning counter-clockwise increases the flame. ID If the temperature of the oven increases excessively, turn off the oven and call the authorised service agent to have oven thermostat repaired. 19I EN - Beko BDVG693 | User Manual - Page 21
Butan/propan Natural gas Fasten the screw Loosen the screw until the end 1/2 round ID If the gas type of the unit is changed, then the rating plate that shows the gas type of the unit must also be changed. 20 I EN - Beko BDVG693 | User Manual - Page 22
coated trays, since the heat transmission will be better. • While cooking your meals, perform a preheating operation if it is advised in the user manual or cooking instructions. • During cooking, do not open the oven door frequently. • Try to cook more than one type of meal within the oven at the - Beko BDVG693 | User Manual - Page 23
lid. Switch off the hob if safe to do so and phone the fire service. • Ensure handles of pans cannot accidentally be caught or knocked and do not not go beyond the bottom of the pan always place the pan onto the pan support in a central position. How to use hobs 1 List of advised diameter of pots - Beko BDVG693 | User Manual - Page 24
Switch off the gas burners • Keep the knob at pressed position Turn burner control knob to off for 3-5 seconds after you see the position (top). flame around the burner. Flame failure device • Repeat the sequence of operations if the flame does not ignite. After In case of any you release - Beko BDVG693 | User Manual - Page 25
6 How to operate the oven General information on baking, roasting and grilling At Risk of scalding by hot steam! Take care when opening the oven door as steam may escape. Tips for baking Select the correct shelf position before turning the oven on - don't move oven shelves when hot. Always preheat - Beko BDVG693 | User Manual - Page 26
200 220 240 280 Temperature °F 266 284 320 347 374 392 428 482 536 Cooking times table ▪ The timings in this chart are meant as a guide. Timings may vary due to temperature of food, thickness, type and your own preference of cooking. -Preheat oven first [I] Level 1 is the bottom level in - Beko BDVG693 | User Manual - Page 27
Food Fruit pies Pizza Small cakes One tray Two trays Victoria sandwich Biscuits Scones Rich fruit cake (20-22cm) Roast beef; Sirloin, topside, toprump, rib Preheating * Insertion level 10 min. 4 10 min. 4 or 5 10 min. 10 min. 4 4 and 2 4 10 min. 4 10 min. 4 10 min. 3 10 min. 3 Gas - Beko BDVG693 | User Manual - Page 28
How to use the gas oven - Top oven The gas oven is operated by the gas oven control knob. In off position (top) the gas supply is locked. Switch on the gas oven The gas oven is ignited with the ignition button. 1. Open oven door. 2. Keep grill control knob pressed and turn it counterclockwise. 3. - Beko BDVG693 | User Manual - Page 29
, pull as shown in picture and hold with two hands from two sides. Cooking times table ID The timings in this chart are meant as a guide. Timings may vary due to temperature of food, thickness, type and your own preference of cooking. -Preheat oven first ID Level 1 is the bottom level - Beko BDVG693 | User Manual - Page 30
Food Preheating * Insertion Gas mark Cooking time level Casseroles 10 min. 1 3 2-3 hours Whole fish 10 min. 1 4 20-30 mins Pasta bake 10 min. 1 5 25-30 mins * at control knob position 7 /-- depending on quantity / * depending on size How to operate the gas grillTop oven This - Beko BDVG693 | User Manual - Page 31
and/or wait at least 1 min before attempting a further ignition of the burner." Cooking times table ID The timings in this chart are meant as a guide. Timings may vary due to temperature of food, thickness, type and your own preference of cooking. - If food is cooking too quickly, it can be - Beko BDVG693 | User Manual - Page 32
may scratch the surface. This may destroy the glass. Do not use steam cleaners for cleaning. How to clean the hob Gas hobs 1. Remove pan supports and burner caps and clean them. 2. Clean the hob. 3. Refit burner caps and check that they are securely positioned. 4. While placing pan - Beko BDVG693 | User Manual - Page 33
• To remove the plastic holders (2) , use a flat metal or plastic, e.g., a knife, slotted screwdriver, to free the fixing foot (5). Push the fixing foot through the window (6) in arrow direction. 2 1 Front door 2 Hinge 3 Oven 4 3 2 5 2 6 3 1 Metal part 2 Plastic carrier 3. Move the front - Beko BDVG693 | User Manual - Page 34
Replacing the oven lamp Hot surfaces may cause burns! Make sure that the appliance is switched off and cooled down in order to avoid the risk of an electrical shock. The oven lamp is a special heatresisting (T 300 °C) electric light bulb; see Technical Data, page 5. Oven lamps can be obtained from a - Beko BDVG693 | User Manual - Page 35
during operation. • When the metal parts are heated, they may expand and cause noise. Before you call the service, please check the following points. Electrical equipment Malfunction/problem The appliance does not work. Oven light does not work Oven does not heat. Possible cause The mains fuse is - Beko BDVG693 | User Manual - Page 36
timer (If the appliance has a digital timer) Malfunction/problem Possible cause Clock display is blinking or Power was interrupted clock symbol is on. your area as shown in the Guarantee and Service section of this user manual. ID Do not attempt to repair the appliance yourself. There are - Beko BDVG693 | User Manual - Page 37
• The guarantee is not transferable if the product is resold. • Beko plc disclaims any liability for incidental or consequential damages. • The guarantee requesting service please check the troubleshooting Service once the manufacturers guarantee has expired. guide in the Operating Instructions as - Beko BDVG693 | User Manual - Page 38
- Beko BDVG693 | User Manual - Page 39
- Beko BDVG693 | User Manual - Page 40
Beko plc Beko House 1 Greenhill Crescent Watford Herts WD18 8QU Tel: 0845 600 4911 Printed in Turkey Part no : 285.3007.89 Rev:AB/18.12.2012
-
 1
1 -
 2
2 -
 3
3 -
 4
4 -
 5
5 -
 6
6 -
 7
7 -
8
-
9
-
10
-
11
-
12
-
13
-
14
-
15
-
16
-
17
-
18
-
19
-
20
-
21
-
22
-
23
-
24
-
25
-
26
-
27
-
28
-
29
-
30
-
31
-
32
-
33
-
34
-
35
-
36
-
37
-
38
-
39
-
40
 |
 |
BDVG
693
P
Double
Gas
Oven
User
Manual