Belkin F5D7231-4P User Manual - Page 24
Configuring and Using the USB Print Server - 4 driver
 |
UPC - 722868525173
View all Belkin F5D7231-4P manuals
Add to My Manuals
Save this manual to your list of manuals |
Page 24 highlights
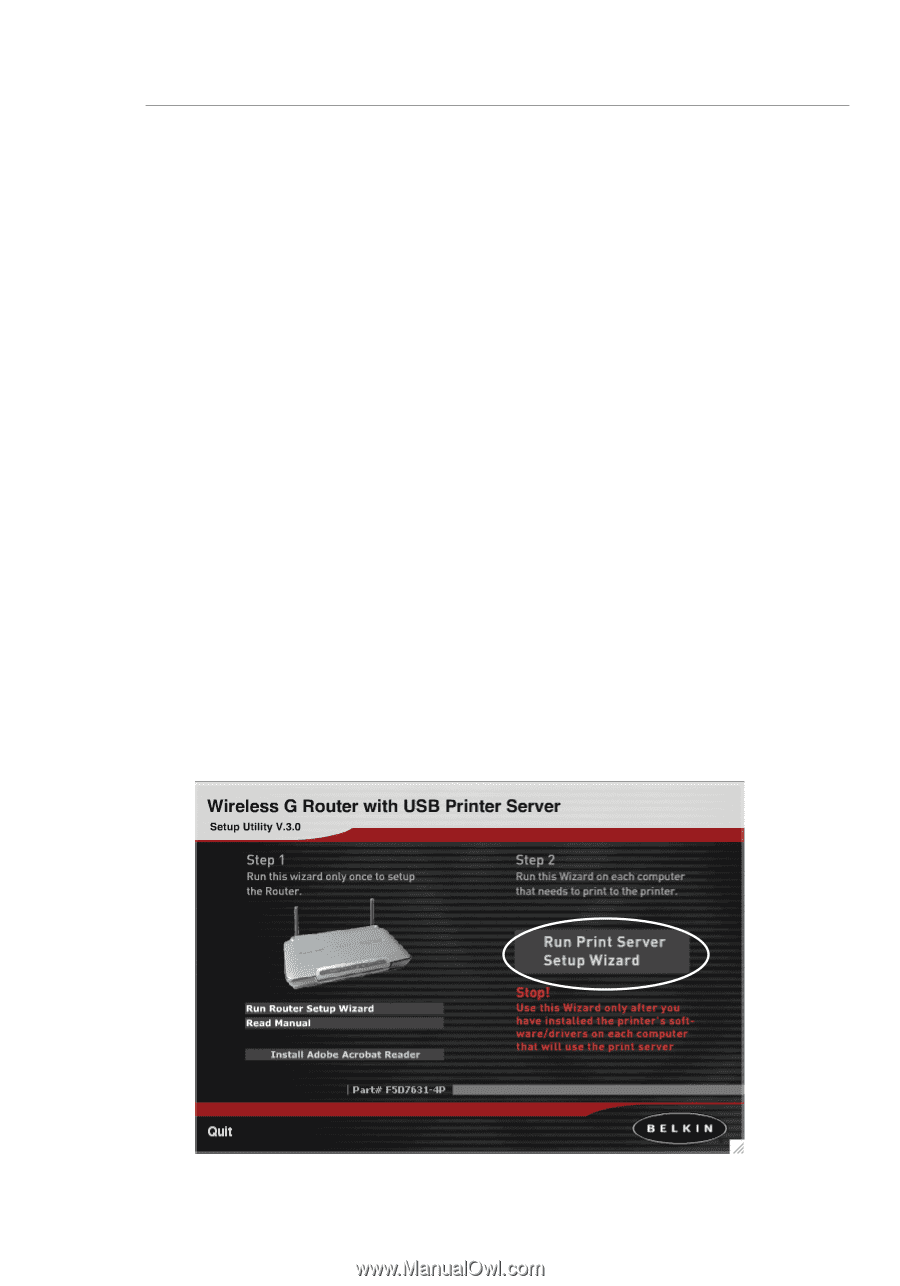
Configuring and Using the USB Print Server Connecting your printer to the Router's print server Please closely follow the directions to set up your printer. Before you start Install the printer's drivers and software on each computer from which you plan to print. This enables the PC to print to the networked printer (printer that is attached to your USB Print Server). Every manufacturer ships its printer with a driver and, usually, printing software. In some cases, while installing the drivers and software for your printer, you may be required to connect the PC directly to the printer in order to complete the installation. This varies according to manufacturer. You must also install the Belkin Printer Port on each of the computers you want to print from. This may be done using the Printer Server Setup Wizard, or can be done manually. Start 1. Insert the CD into your CD-ROM drive. Within 15 seconds, you should see the installation menu on the screen. If the menu does not appear within 15 seconds, select your CD-ROM drive and view the contents of the drive. Double-click on the file named "Start.exe". 2. From the menu, click on "Run Print Server Setup Wizard". This will open the Print Server Setup Wizard menu. 22
-
 1
1 -
2
-
3
-
4
-
5
-
6
-
7
-
8
-
9
-
10
-
11
-
12
-
13
-
14
-
15
-
16
-
17
-
18
-
 19
19 -
 20
20 -
 21
21 -
 22
22 -
 23
23 -
 24
24 -
 25
25 -
 26
26 -
 27
27 -
 28
28 -
 29
29 -
30
-
31
-
32
-
33
-
34
-
35
-
36
-
37
-
38
-
39
-
40
-
41
-
42
-
43
-
44
-
45
-
46
-
47
-
48
-
49
-
50
-
51
-
52
-
53
-
54
-
55
-
56
-
57
-
58
-
59
-
60
-
61
-
62
-
63
-
64
-
65
-
66
-
67
-
68
-
69
-
70
-
71
-
72
-
73
-
74
-
75
-
76
-
77
-
78
-
79
-
80
-
81
-
82
-
83
-
84
-
85
-
86
-
87
-
88
-
89
-
90
-
91
-
92
-
93
-
94
-
95
-
96
-
97
-
98
-
99
-
100
-
101
-
102
-
103
-
104
-
105
-
106
-
107
-
108
-
109
-
110
-
111
-
112
-
113
-
114
-
115
-
116
-
117
-
118
-
119
-
120
-
121
-
122
-
123
-
124
-
125
-
126
-
127
-
128
-
129
-
130
-
131
-
132
-
133
-
134
-
135
-
136
-
137
-
138
-
139
-
140
-
141
-
142
-
143
-
144
-
145
-
146
 |
 |