Belkin F6D4050 User Manual - Page 21
USING THE BELKIN WIRELESS NETWORKING UTILITY, Accessing the Belkin Wireless Networking Utility
 |
View all Belkin F6D4050 manuals
Add to My Manuals
Save this manual to your list of manuals |
Page 21 highlights
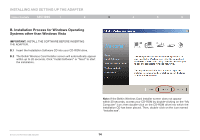
Using the Belkin Wireless Networking Utility Table of Contents sections 1 2 3 4 5 6 After successfully installing the Belkin Wireless Networking Utility (WNU), configurations for wireless connection and security are just a few easy clicks away. Accessing the Belkin Wireless Networking Utility from the Windows System Tray The WNU's default screen is the "Current Status" tab. The "Current Status" tab displays the current Network Status and Available Networks. To access the WNU, simply place your mouse pointer and right-click over the WNU icon on the Windows task tray. If the icon is not present, double-click the Belkin Wireless Networking Utility icon on the desktop screen. Enhanced Wireless USB Adapter 19
-
 1
1 -
2
-
3
-
4
-
5
-
6
-
7
-
8
-
9
-
10
-
11
-
12
-
13
-
14
-
15
-
 16
16 -
 17
17 -
 18
18 -
 19
19 -
 20
20 -
 21
21 -
 22
22 -
 23
23 -
 24
24 -
 25
25 -
 26
26 -
27
-
28
-
29
-
30
-
31
-
32
-
33
-
34
-
35
-
36
-
37
-
38
-
39
-
40
-
41
-
42
-
43
 |
 |

19
Enhanced Wireless USB Adapter
SECTIONS
Table of Contents
1
2
3
5
6
USING THE BELKIN WIRELESS NETWORKING UTILITY
4
After successfully installing the Belkin Wireless Networking Utility (WNU), configurations for wireless connection and security are
just a few easy clicks away°
Accessing the Belkin Wireless Networking Utility from
the Windows System Tray
To access the WNU, simply place your mouse pointer and right-click
over the WNU icon on the Windows task tray°
If the icon is not present, double-click the Belkin Wireless Networking
Utility icon on the desktop screen°
The WNU’s default screen is the “Current Status” tab° The “Current
Status” tab displays the current Network Status and Available Networks°