Bernina 2500DCET Manual - Page 48
Top & bottom cover stitch thread
 |
View all Bernina 2500DCET manuals
Add to My Manuals
Save this manual to your list of manuals |
Page 48 highlights
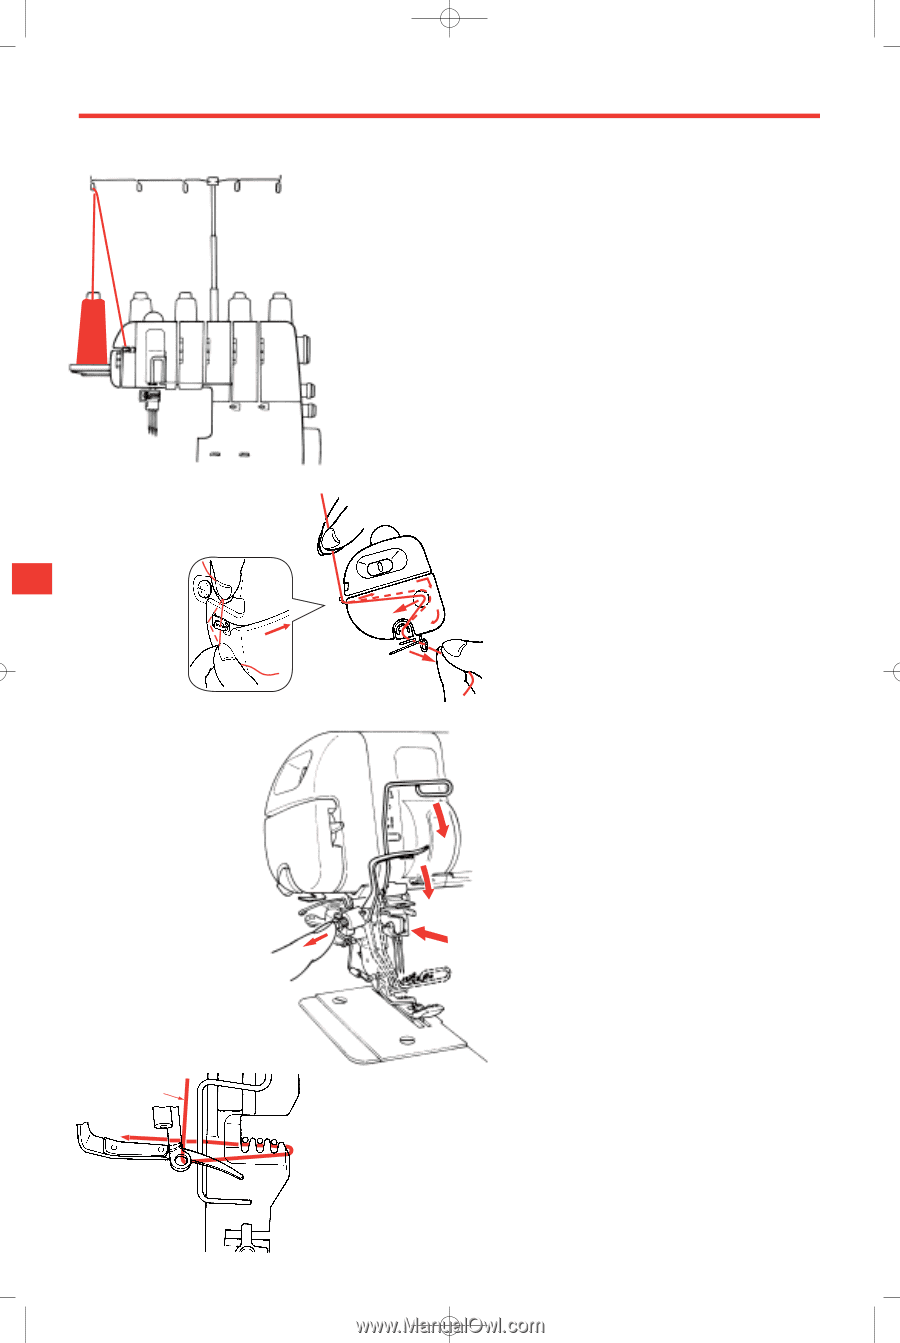
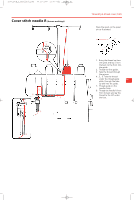
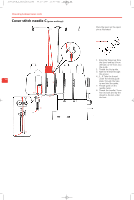
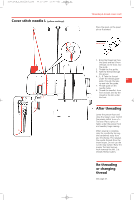
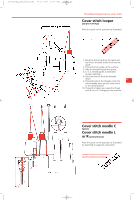
2500_DCE_2_englisch_neu 09.10.2007 15:00 Uhr Seite 48 Threading 5-thread top & bottom cover stitch Top & bottom cover stitch thread (grey markings) Place the spool on the spool pin as illustrated. Test sewing with 4 thread (3-needles) cover stitch has been completed. The presser foot is raised, the needle threads are released, the material has been pulled away to the left and threads cut. You are now ready to thread for the 5 thread top & bottom cover stitch. the machine is still switched on «l». 1. Turn the stitch selection dial to «H». 2. Place a double layer of fabric under the needles and presser foot. 3. Lower the presser foot. 4. Press the needle stop button so that the needles are in their highest position. 5. Press wiper activating lever until it clicks into position. 6. Lower the wiper. 7. Press needle stop button to lower the needles. 8. Switch the power switch to off «O». 9. Bring the thread up from the spool and 48 lay it from the back to the front into the guide. 10. Holding the thread in both hands, thread the first guide located behind the machine head. 11. Take the thread through the groove indicated by arrows on the cover (see diagram). 12. Bring the thread into the guide and eyelet, make sure that the thread is in the tension discs by pulling it firmly with both hands (see diagram). 13. Thread the eyelet of the feeding link (see diagram). 14. Raise the presser foot. Pull the thread over the wiper and in front of the needles and then place it under the presser foot (see diagram). 15. Lower the presser foot and the finger guard. 16. Turn the handwheel towards you one or two revolutions, this will thread the wiper, turn the power switch to on «l», begin sewing. CAUTION: Check to be sure the finger guard is in its lowest fixed position.
-
 1
1 -
2
-
3
-
4
-
5
-
6
-
7
-
8
-
9
-
10
-
11
-
12
-
13
-
14
-
15
-
16
-
17
-
18
-
19
-
20
-
21
-
22
-
23
-
24
-
25
-
26
-
27
-
28
-
29
-
30
-
31
-
32
-
33
-
34
-
35
-
36
-
37
-
38
-
39
-
40
-
41
-
42
-
 43
43 -
 44
44 -
 45
45 -
 46
46 -
 47
47 -
 48
48 -
 49
49 -
 50
50 -
 51
51 -
 52
52 -
 53
53 -
54
-
55
-
56
-
57
-
58
-
59
-
60
-
61
-
62
-
63
-
64
-
65
-
66
-
67
-
68
-
69
-
70
-
71
-
72
-
73
-
74
-
75
-
76
-
77
-
78
-
79
-
80
-
81
-
82
 |
 |