Bernina 2500DCET Manual - Page 64
Sewing in the thread chain, seam begin, seam end, Securing thread chains, Sewing curves
 |
View all Bernina 2500DCET manuals
Add to My Manuals
Save this manual to your list of manuals |
Page 64 highlights
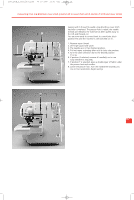
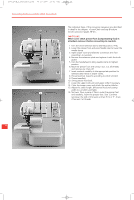
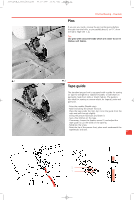
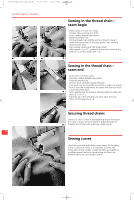
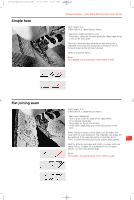
2500_DCE_2_englisch_neu 09.10.2007 15:01 Uhr Seite 64 Practical Sewing - Overlock ▲1 ▼3 ▲2 Sewing in the thread chain - seam begin · Sew to form a 3-4 cm (2") chain. · Position fabric and sew one stitch. · Insert needles (Needle stop down). · Raise the presser foot. · Pull the thread chain slightly and from the left, place it under the presser foot (in the tape guide if you wanted). · Lower presser foot. · Start sewing, sewing over the thread chain. · After approx. 2 cm /1", guide the thread chain towards the knife to cut off the excess (see 1, 2). ▼4 Sewing in the thread chain - seam end · Sew to the end of the seam. · Raise the needles (Needle stop down). · Raise the presser foot. · Remove work carefully towards the back. · Turn work over and towards you and lay it under the presser foot so that the needle enters the fabric with the first stitch. · Lower the presser foot. ▼ 5 · Sew carefully over the previous stitching without cutting for about 2-3 cm (1"). · Raise the tip of the foot and turn work away from you. · Stitch off the edge (see 3, 4). Securing thread chains Leave a 12 cm / 5" chain at the beginning and at the end of the seam so that it can be knotted or pulled through the ▼ 6 first/last few stitches with a darning needle (see 5). 64 Sewing curves Overlocking outside and inside curves is easy. As the fabric is first cut and then sewn, it is important to watch the knives and not the needles. Guide the fabric as straight as possible towards the knife. Avoid letting the fabric slip between the knives and needles (see 6).
-
 1
1 -
2
-
3
-
4
-
5
-
6
-
7
-
8
-
9
-
10
-
11
-
12
-
13
-
14
-
15
-
16
-
17
-
18
-
19
-
20
-
21
-
22
-
23
-
24
-
25
-
26
-
27
-
28
-
29
-
30
-
31
-
32
-
33
-
34
-
35
-
36
-
37
-
38
-
39
-
40
-
41
-
42
-
43
-
44
-
45
-
46
-
47
-
48
-
49
-
50
-
51
-
52
-
53
-
54
-
55
-
56
-
57
-
58
-
 59
59 -
 60
60 -
 61
61 -
 62
62 -
 63
63 -
 64
64 -
 65
65 -
 66
66 -
 67
67 -
 68
68 -
 69
69 -
70
-
71
-
72
-
73
-
74
-
75
-
76
-
77
-
78
-
79
-
80
-
81
-
82
 |
 |
