Bernina 2500DCET Manual - Page 55
Sewing test, Fine tuning chain stitch, Fine tuning
 |
View all Bernina 2500DCET manuals
Add to My Manuals
Save this manual to your list of manuals |
Page 55 highlights
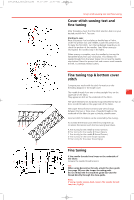
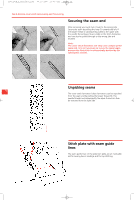
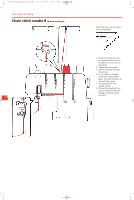
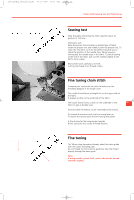
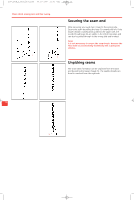
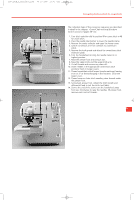
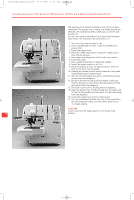
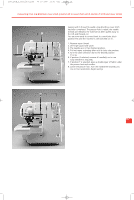
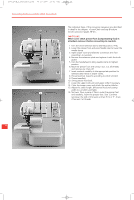
2500_DCE_2_englisch_neu 09.10.2007 15:01 Uhr Seite 55 Chain stitch sewing test and fine tuning Sewing test After threading check that the stitch selection dial is on position G. Test sew. Starting to sew: Raise the presser foot and place a double layer of fabric under the presser foot and needle. Lower the presser foot. To make the first stitch, turn the handwheel towards you to check the position of the needle. Sew. When sewing is interrupted, the needle stops in the fabric. Continue sewing at the end of the seam, pull out the material slightly to the left to form a chain. Remove the work carefully to the left. Cutting the thread chain (thread cutter). Fine tuning chain stitch Compare your result with the stitch formation on the threading diagram in the looper cover. The needle thread forms a straight line on the upper side of the fabric. It appears as dots on the underside of the fabric. The looper thread forms a chain on the underside of the 55 fabric to give a durable seam. Incorrect stitch formation can be corrected by fine tuning. To increase the tension push the fine tuning lever up. To reduce the tension push the fine tuning lever down. A Fine tuning for the lower looper (purple) B Fine tuning for the needle R thread (brown) Fine tuning Tip: When using decorative threads, attach the deco guide over the looper threading path. B Do not thread the first machine guide but take the thread directly through the deco guide. Note: If using needle system JLx2, reduce the needle thread A tensions slightly.
-
 1
1 -
2
-
3
-
4
-
5
-
6
-
7
-
8
-
9
-
10
-
11
-
12
-
13
-
14
-
15
-
16
-
17
-
18
-
19
-
20
-
21
-
22
-
23
-
24
-
25
-
26
-
27
-
28
-
29
-
30
-
31
-
32
-
33
-
34
-
35
-
36
-
37
-
38
-
39
-
40
-
41
-
42
-
43
-
44
-
45
-
46
-
47
-
48
-
49
-
 50
50 -
 51
51 -
 52
52 -
 53
53 -
 54
54 -
 55
55 -
 56
56 -
 57
57 -
 58
58 -
 59
59 -
 60
60 -
61
-
62
-
63
-
64
-
65
-
66
-
67
-
68
-
69
-
70
-
71
-
72
-
73
-
74
-
75
-
76
-
77
-
78
-
79
-
80
-
81
-
82
 |
 |
