Brother International CS-8060 Users Manual - English - Page 24
Upper Threading, About the spool of thread - instructions
 |
View all Brother International CS-8060 manuals
Add to My Manuals
Save this manual to your list of manuals |
Page 24 highlights
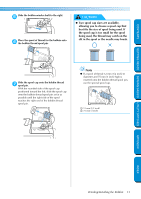
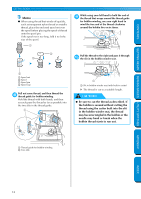
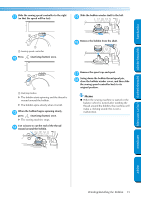
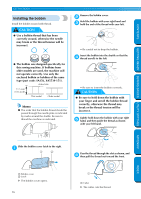
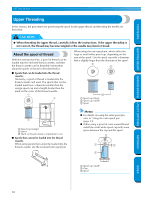
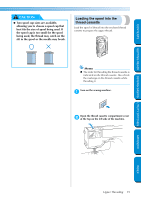
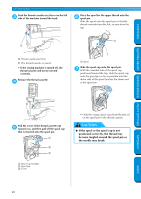
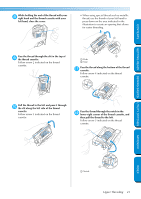
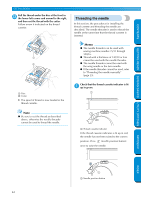
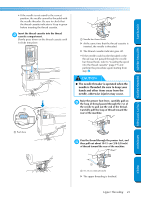
GETTING READY CONTENTS GETTING READY SEWING BASICS UTILITY STITCHES Upper Threading In this section, the procedures for positioning the spool for the upper thread and threading the needle are described. CAUTION ● When threading the upper thread, carefully follow the instructions. If the upper threading is not correct, the thread may become tangled or the needle may bend or break. About the spool of thread With this sewing machine, a spool of thread can be loaded into the enclosed thread cassette, and then the thread cassette can be threaded. Information about the spools of thread is described below. ■ Spools that can be loaded into the thread cassette Normally, a spool of thread is loaded into the thread cassette and used. The spools that can be loaded must have a diameter smaller than the orange spool cap and a height shorter than the mark on the cover of the thread cassette. 1 3 1 When using the extra spool pin, attach either the large or small white spool cap, depending on the size of the spool. Use the spool cap with a diameter that is slightly larger than the diameter of the spool. 1 2 3 1 Spool cap (large) 2 Spool cap (small) 3 Spool 2 1 Spool cap (orange) 2 Spool 3 Mark on thread cassette compartment cover ■ Spools that cannot be loaded into the thread cassette When using spools that cannot be loaded into the thread cassette, use the enclosed extra spool pin. Memo ● For details on using the extra spool pin, refer to "Using the extra spool pin" (page 24). ● When using a spool of cross-wound thread, install the small white spool cap with some space between the cap and the spool. 1 2 3 APPENDIX 1 Spool cap (small) 2 Gap 3 Spool INDEX 18
-
 1
1 -
2
-
3
-
4
-
5
-
6
-
7
-
8
-
9
-
10
-
11
-
12
-
13
-
14
-
15
-
16
-
17
-
18
-
 19
19 -
 20
20 -
 21
21 -
 22
22 -
 23
23 -
 24
24 -
 25
25 -
 26
26 -
 27
27 -
 28
28 -
 29
29 -
30
-
31
-
32
-
33
-
34
-
35
-
36
-
37
-
38
-
39
-
40
-
41
-
42
-
43
-
44
-
45
-
46
-
47
-
48
-
49
-
50
-
51
-
52
-
53
-
54
-
55
-
56
-
57
-
58
-
59
-
60
-
61
-
62
-
63
-
64
-
65
-
66
-
67
-
68
-
69
-
70
-
71
-
72
-
73
-
74
-
75
-
76
-
77
-
78
-
79
-
80
-
81
-
82
-
83
-
84
-
85
-
86
-
87
-
88
-
89
-
90
-
91
-
92
-
93
-
94
-
95
-
96
-
97
-
98
-
99
-
100
-
101
-
102
-
103
-
104
-
105
-
106
-
107
-
108
-
109
-
110
-
111
-
112
-
113
-
114
-
115
-
116
 |
 |
