Brother International E-100 Users Manual - English - Page 20
Inserting the thread cartridge and design frame
 |
View all Brother International E-100 manuals
Add to My Manuals
Save this manual to your list of manuals |
Page 20 highlights
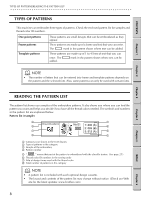
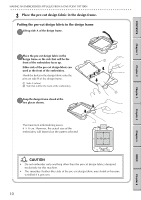
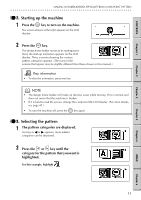
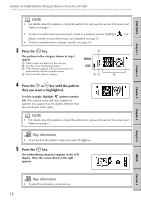
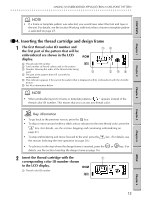
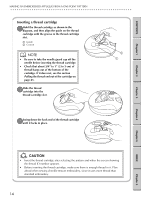
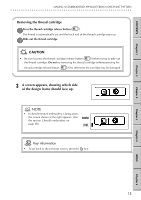
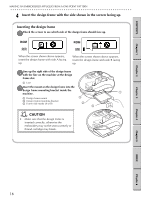
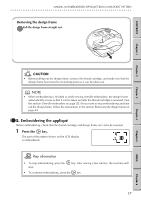
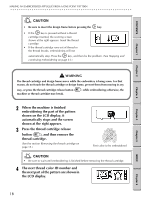
CONTENTS Chapter 1 Chapter 2 Chapter 3 MAKING AN EMBROIDERED APPLIQUÉ FROM A ONE-POINT PATTERN G G G G G G G G G G G G G G G G G G G G G G G G G G G G G G G G G G G G G G G G G G G G G G G G G G G G G G G G G NOTE • If a frame or template pattern was selected, you would now select the font and type in the text. For details, see the section Working with text (when a frame or template pattern is selected) on page 27. GG 4. Inserting the thread cartridge and design frame 1 The first thread color ID number and the first part of the pattern that will be embroidered are shown in the LCD display. 13 1 Thread color ID number 2 Total number of thread colors used in the pattern 3 Number showing the order of the thread color being used 5 2 46 4 The part of the pattern that will currently be embroidered 5 This indicator appears if the part of the pattern that is displayed will be embroidered with the chenille texture. 6 See Key information below. NOTE • When embroidering text in frame or template patterns, " " appears instead of the thread color ID number. This means that you can use any thread color. Key information • To go back to the previous screen, press the key. • To skip or move around within a stitch area or advance to the next thread color, press the key. (For details, see the section Stopping and continuing embroidering on page 41.) • To stop embroidering and move forward to the end, press the the section Selecting the next operation on page 20.) key. (For details, see • To advance to the step where the design frame is inserted, press the or key. (For details, see the section Inserting the design frame on page 16.) 2 Insert the thread cartridge with the 1 corresponding color ID number shown in the LCD display. 1 Thread color ID number Chapter 4 Chapter 5 INDEX Chapter 6 13
-
 1
1 -
2
-
3
-
4
-
5
-
6
-
7
-
8
-
9
-
10
-
11
-
12
-
13
-
14
-
 15
15 -
 16
16 -
 17
17 -
 18
18 -
 19
19 -
 20
20 -
 21
21 -
 22
22 -
 23
23 -
 24
24 -
 25
25 -
26
-
27
-
28
-
29
-
30
-
31
-
32
-
33
-
34
-
35
-
36
-
37
-
38
-
39
-
40
-
41
-
42
-
43
-
44
-
45
-
46
-
47
-
48
-
49
-
50
-
51
-
52
-
53
-
54
-
55
-
56
-
57
-
58
-
59
-
60
-
61
-
62
-
63
-
64
-
65
-
66
 |
 |