Brother International E-100 Users Manual - English - Page 32
Chenille embroidery, the right appears, insert the design
 |
View all Brother International E-100 manuals
Add to My Manuals
Save this manual to your list of manuals |
Page 32 highlights
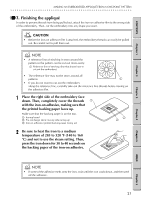
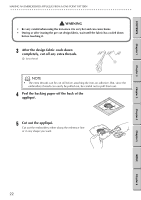
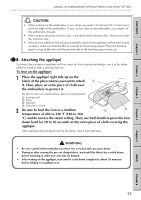
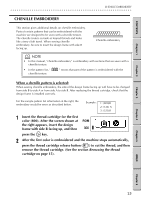
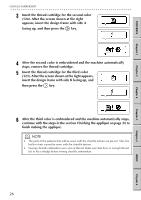
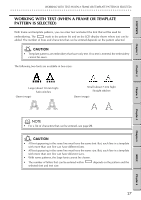
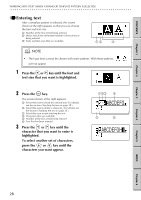
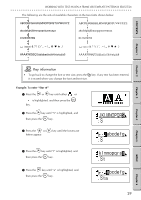
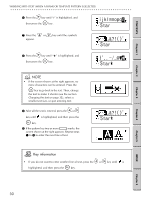
CONTENTS Chapter 1 Chapter 2 CHENILLE EMBROIDERY G G G G G G G G G G G G G G G G G G G G G G G G G G G G G G G G G G G G G G G G G G G G G G G G G G G G G G G G G CHENILLE EMBROIDERY This section gives additional details on chenille embroidery. Parts of certain patterns that can be embroidered with the machine are designed to be sewn with a chenille texture. The chenille texture is made of looped threads and looks like a terry cloth towel. When sewing chenille embroidery, be sure to insert the design frame with side B facing up. Chenille embroidery NOTE • In this manual, "chenille embroidery" is embroidery with sections that are sewn with a chenille texture. • In the pattern list, " chenille texture. " means that part of the pattern is embroidered with the When a chenille pattern is selected: When sewing chenille embroidery, the side of the design frame facing up will have to be changed from side B to side A or from side A to side B. After replacing the thread cartridge, check that the design frame is installed correctly. For the sample pattern list information at the right, the embroidery would be sewn as described below. Example: 1: (800)B 2: (124) A 3: (323)B 1 Insert the thread cartridge for the first color (800). After the screen shown at the right appears, insert the design frame with side B facing up, and then press the key. 2 After the first color is embroidered and the machine stops automatically, press the thread cartridge release button ( ) to cut the thread, and then remove the thread cartridge. (See the section Removing the thread cartridge on page 15). Chapter 3 Chapter 4 Chapter 5 INDEX Chapter 6 25
-
 1
1 -
2
-
3
-
4
-
5
-
6
-
7
-
8
-
9
-
10
-
11
-
12
-
13
-
14
-
15
-
16
-
17
-
18
-
19
-
20
-
21
-
22
-
23
-
24
-
25
-
26
-
 27
27 -
 28
28 -
 29
29 -
 30
30 -
 31
31 -
 32
32 -
 33
33 -
 34
34 -
 35
35 -
 36
36 -
 37
37 -
38
-
39
-
40
-
41
-
42
-
43
-
44
-
45
-
46
-
47
-
48
-
49
-
50
-
51
-
52
-
53
-
54
-
55
-
56
-
57
-
58
-
59
-
60
-
61
-
62
-
63
-
64
-
65
-
66
 |
 |