Brother International PC-8200 Users Manual - English - Page 31
Changing The Presser Foot
 |
View all Brother International PC-8200 manuals
Add to My Manuals
Save this manual to your list of manuals |
Page 31 highlights
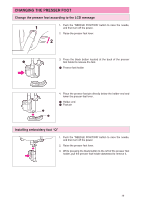
CHANGING THE PRESSER FOOT Change the presser foot according to the LCD message 1. Push the "NEEDLE POSITION" button to raise the needle, 1 and then turn off the power. 2. Raise the presser foot lever. 2 3. Press the black button located at the back of the presser 1 foot holder to release the foot. 1 Presser foot holder 1 2 4. Place the presser foot pin directly below the holder-end and lower the presser foot lever. 1 Holder-end 2 Foot pin Installing embroidery foot "Q" 5 1. Push the "NEEDLE POSITION" button to raise the needle, and then turn off the power. 2. Raise the presser foot lever. 3. While pressing the black button to the left of the presser foot holder, pull the presser foot holder downward to remove it. 29
-
 1
1 -
2
-
3
-
4
-
5
-
6
-
7
-
8
-
9
-
10
-
11
-
12
-
13
-
14
-
15
-
16
-
17
-
18
-
19
-
20
-
21
-
22
-
23
-
24
-
25
-
 26
26 -
 27
27 -
 28
28 -
 29
29 -
 30
30 -
 31
31 -
 32
32 -
 33
33 -
 34
34 -
 35
35 -
 36
36 -
37
-
38
-
39
-
40
-
41
-
42
-
43
-
44
-
45
-
46
-
47
-
48
-
49
-
50
-
51
-
52
-
53
-
54
-
55
-
56
-
57
-
58
-
59
-
60
-
61
-
62
-
63
-
64
-
65
-
66
-
67
-
68
-
69
-
70
-
71
-
72
-
73
-
74
-
75
-
76
-
77
-
78
-
79
-
80
-
81
-
82
-
83
-
84
-
85
-
86
-
87
-
88
-
89
-
90
-
91
-
92
-
93
-
94
-
95
-
96
-
97
-
98
-
99
-
100
-
101
-
102
-
103
-
104
-
105
-
106
-
107
-
108
-
109
-
110
-
111
-
112
-
113
-
114
-
115
-
116
-
117
-
118
-
119
-
120
-
121
-
122
-
123
-
124
-
125
-
126
-
127
-
128
-
129
-
130
-
131
-
132
-
133
-
134
-
135
-
136
-
137
-
138
-
139
-
140
-
141
-
142
-
143
-
144
-
145
-
146
-
147
-
148
-
149
-
150
-
151
-
152
-
153
-
154
-
155
-
156
-
157
-
158
-
159
-
160
-
161
-
162
-
163
-
164
-
165
-
166
-
167
-
168
-
169
-
170
-
171
-
172
-
173
-
174
-
175
-
176
-
177
-
178
-
179
-
180
 |
 |

29
CHANGING THE PRESSER FOOT
Change the presser foot according to the LCD message
1
2
1.
Push the “NEEDLE POSITION” button to raise the needle,
and then turn off the power.
2.
Raise the presser foot lever.
Installing embroidery foot
“
Q
”
5
1.
Push the
“
NEEDLE POSITION
”
button to raise the needle,
and then turn off the power.
2.
Raise the presser foot lever.
3.
While pressing the black button to the left of the presser foot
holder, pull the presser foot holder downward to remove it.
1
3.
Press the black button located at the back of the presser
foot holder to release the foot.
1
Presser foot holder
1
2
4.
Place the presser foot pin directly below the holder-end and
lower the presser foot lever.
1
Holder-end
2
Foot pin