Brother International PC-8200 Users Manual - English - Page 32
Changing the embroidery foot, Feed dog adjustment - sewing and embroidery machine
 |
View all Brother International PC-8200 manuals
Add to My Manuals
Save this manual to your list of manuals |
Page 32 highlights
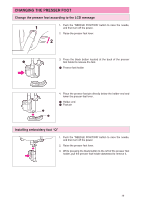
5 4. Raise the presser foot lever to the highest position. While pressing the black button to the left of the embroidery foot "Q", push embroidery foot "Q" upward with both hands as far as it will go to install it. CAUTION Be careful not to touch the needle during this time, otherwise injury may result. Changing the embroidery foot 5 1. Raise the presser foot lever to the highest position. While pressing the black button to the left of embroidery foot "Q", pull embroidery foot "Q" downward to remove it. 5 2. While pressing the black button to the left of the presser foot holder, push the presser foot holder upward with both hands as far as it will go to install it. CAUTION Be careful not to touch the needle during this time, otherwise injury may result. Feed dog adjustment With the accessory compartment off the machine, the feed dog adjustment lever can be seen on the base of the sewing machine. Sliding the lever to the right will lower the feed dogs. Feed dogs are lowered during button sewing as well. If you are continuing to sew, slide the lever to the left and the feed dogs will raise. * When the embroidery unit is on to the machine, the feed dogs drop automatically. 30
-
 1
1 -
2
-
3
-
4
-
5
-
6
-
7
-
8
-
9
-
10
-
11
-
12
-
13
-
14
-
15
-
16
-
17
-
18
-
19
-
20
-
21
-
22
-
23
-
24
-
25
-
26
-
 27
27 -
 28
28 -
 29
29 -
 30
30 -
 31
31 -
 32
32 -
 33
33 -
 34
34 -
 35
35 -
 36
36 -
 37
37 -
38
-
39
-
40
-
41
-
42
-
43
-
44
-
45
-
46
-
47
-
48
-
49
-
50
-
51
-
52
-
53
-
54
-
55
-
56
-
57
-
58
-
59
-
60
-
61
-
62
-
63
-
64
-
65
-
66
-
67
-
68
-
69
-
70
-
71
-
72
-
73
-
74
-
75
-
76
-
77
-
78
-
79
-
80
-
81
-
82
-
83
-
84
-
85
-
86
-
87
-
88
-
89
-
90
-
91
-
92
-
93
-
94
-
95
-
96
-
97
-
98
-
99
-
100
-
101
-
102
-
103
-
104
-
105
-
106
-
107
-
108
-
109
-
110
-
111
-
112
-
113
-
114
-
115
-
116
-
117
-
118
-
119
-
120
-
121
-
122
-
123
-
124
-
125
-
126
-
127
-
128
-
129
-
130
-
131
-
132
-
133
-
134
-
135
-
136
-
137
-
138
-
139
-
140
-
141
-
142
-
143
-
144
-
145
-
146
-
147
-
148
-
149
-
150
-
151
-
152
-
153
-
154
-
155
-
156
-
157
-
158
-
159
-
160
-
161
-
162
-
163
-
164
-
165
-
166
-
167
-
168
-
169
-
170
-
171
-
172
-
173
-
174
-
175
-
176
-
177
-
178
-
179
-
180
 |
 |
