Brother International PC-8500 Users Manual - English - Page 71
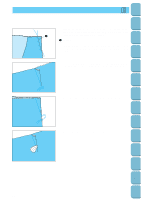
Side application, Press the seam allowance open and align the folded hem
 |
View all Brother International PC-8500 manuals
Add to My Manuals
Save this manual to your list of manuals |
Page 71 highlights
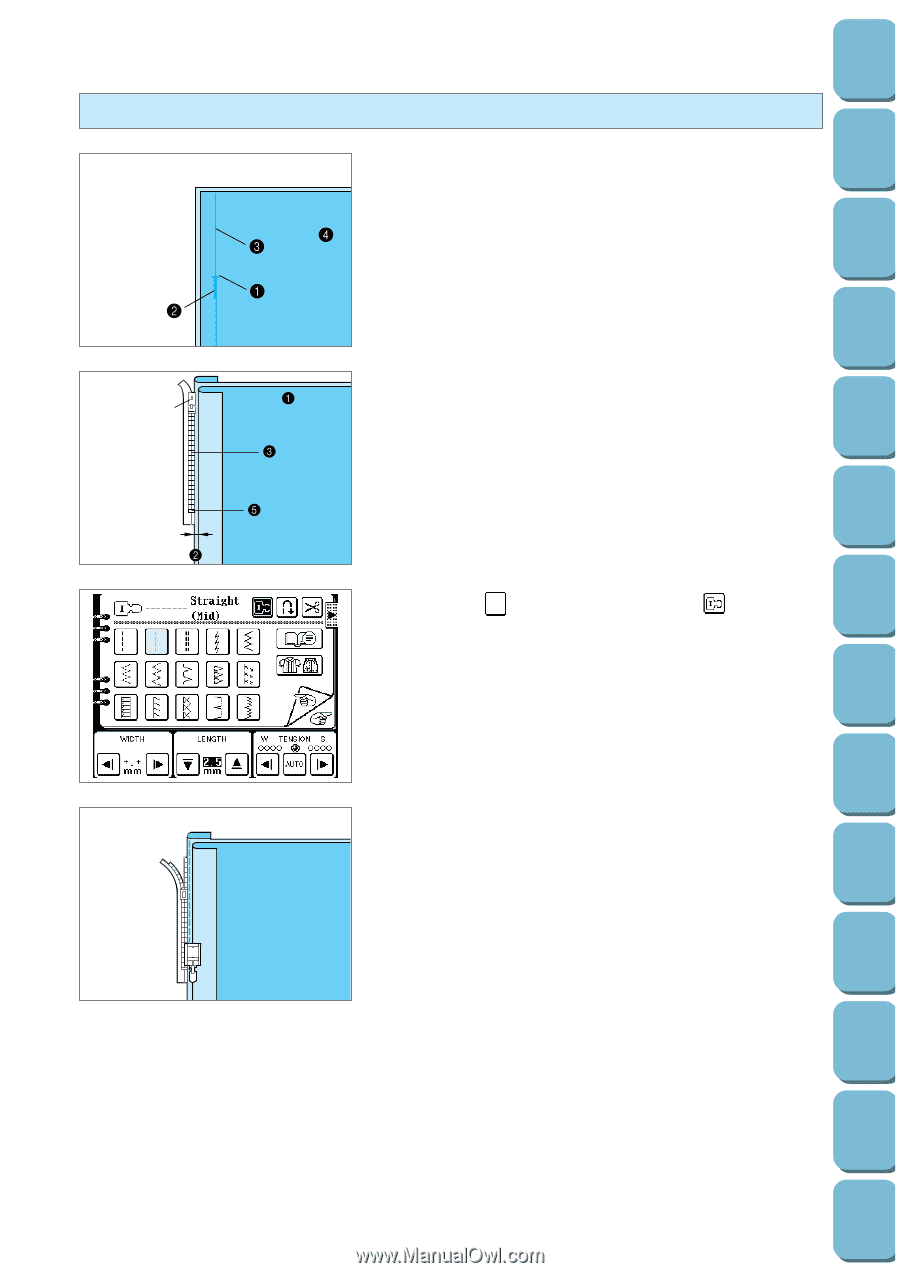
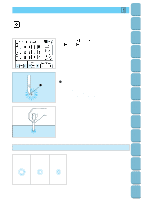
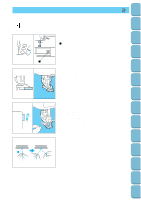
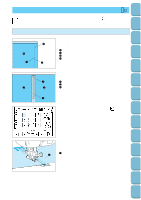
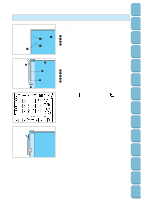
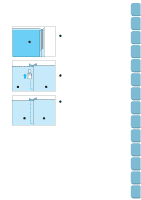
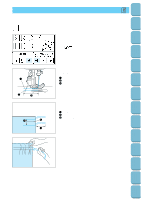
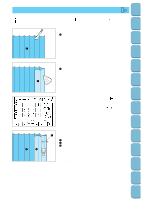
Setting Up Sewing Utility Stitches Characters and Decorative Stitches Embroidering Editing Embroidery Patterns Side application 4 1. Attach presser foot "J" and sew straight stitches up to the crotch end. Change to a basting stitch and sew to the top of the fabric. 1 Crotch end 2 Reverse stitch 3 Basting stitch 4 Reverse side 2. Press the seam allowance open and align the folded hem along the teeth of the zipper, while keeping 3 mm (1/8") for the sewing space. 1 Reverse side 2 Keep 3 mm (1/8") for sewing 3 Teeth of zipper 4 Slider on head of zipper 5 Crotch end (Base of zipper) 3. Select the " " stitch and then touch the " " key. The necessary adjustment for zipper insertion will be carried out automatically. 4. Put the left side of presser foot "I" into the holder, and then sew the bottom layer to the crotch end (base of zipper). * When the automatic thread cutting and automatic reinforcement stitch are preset, reinforcement stitches will be sewn automatically at the start of sewing. Press the "REVERSE STITCH" button to sew a reinforcement stitch and trim the thread automatically at the finish of sewing. I Retrieving My Custom Stitch TM Error Maintenance Messages Trouble shooting Sewing Chart Patterns (Programmed in Machine) Patterns (Memory Card) 68
-
 1
1 -
2
-
3
-
4
-
5
-
6
-
7
-
8
-
9
-
10
-
11
-
12
-
13
-
14
-
15
-
16
-
17
-
18
-
19
-
20
-
21
-
22
-
23
-
24
-
25
-
26
-
27
-
28
-
29
-
30
-
31
-
32
-
33
-
34
-
35
-
36
-
37
-
38
-
39
-
40
-
41
-
42
-
43
-
44
-
45
-
46
-
47
-
48
-
49
-
50
-
51
-
52
-
53
-
54
-
55
-
56
-
57
-
58
-
59
-
60
-
61
-
62
-
63
-
64
-
65
-
 66
66 -
 67
67 -
 68
68 -
 69
69 -
 70
70 -
 71
71 -
 72
72 -
 73
73 -
 74
74 -
 75
75 -
 76
76 -
77
-
78
-
79
-
80
-
81
-
82
-
83
-
84
-
85
-
86
-
87
-
88
-
89
-
90
-
91
-
92
-
93
-
94
-
95
-
96
-
97
-
98
-
99
-
100
-
101
-
102
-
103
-
104
-
105
-
106
-
107
-
108
-
109
-
110
-
111
-
112
-
113
-
114
-
115
-
116
-
117
-
118
-
119
-
120
-
121
-
122
-
123
-
124
-
125
-
126
-
127
-
128
-
129
-
130
-
131
-
132
-
133
-
134
-
135
-
136
-
137
-
138
-
139
-
140
-
141
-
142
-
143
-
144
-
145
-
146
-
147
-
148
-
149
-
150
-
151
-
152
-
153
-
154
-
155
-
156
-
157
-
158
-
159
-
160
-
161
-
162
-
163
-
164
-
165
-
166
-
167
-
168
-
169
-
170
-
171
-
172
-
173
-
174
-
175
-
176
-
177
-
178
-
179
-
180
-
181
-
182
-
183
-
184
-
185
-
186
-
187
-
188
-
189
-
190
-
191
-
192
-
193
-
194
-
195
-
196
 |
 |