Campbell Scientific 10525 ENC10/12, ENC12/14, ENC14/16, ENC16/18 Enclosures - Page 31
inside, outside, using a #22 .157 drill bit.
 |
View all Campbell Scientific 10525 manuals
Add to My Manuals
Save this manual to your list of manuals |
Page 31 highlights
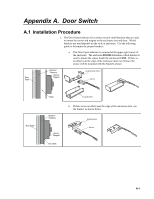
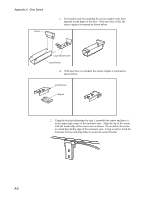
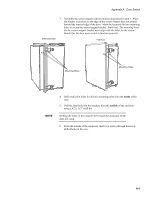
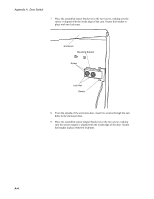
Appendix A. Door Switch 3. Assemble the sensor magnet with the bracket determined in step 1. Place the bracket in position so the edge of the sensor magnet does not extend beyond the internal edge of the door. Mark the locations for two mounting holes to secure the sensor magnet bracket. Important: The mounting holes for the sensor magnet bracket must align with the holes for the sensor bracket for the door open switch to function properly. Extended Door Flat Door Mounting Holes Mounting Holes NOTE 4. Drill small pilot holes for all four mounting holes from the inside of the case. 5. Drill the final holes for the brackets from the outside of the enclosure using a #22 (.157") drill bit. Drilling the holes in this manner will ensure the enclosure finish does not crack. 6. From the outside of the enclosure, insert two screws through the newly drilled holes in the case. A-3
-
 1
1 -
2
-
3
-
4
-
5
-
6
-
7
-
8
-
9
-
10
-
11
-
12
-
13
-
14
-
15
-
16
-
17
-
18
-
19
-
20
-
21
-
22
-
23
-
24
-
25
-
 26
26 -
 27
27 -
 28
28 -
 29
29 -
 30
30 -
 31
31 -
 32
32 -
 33
33 -
 34
34 -
 35
35 -
 36
36 -
37
-
38
-
39
-
40
-
41
-
42
-
43
-
44
-
45
-
46
-
47
-
48
 |
 |
